Introduction
A Creative Platform Where Talent Shines, Connections Grow, and Opportunities Begin
Be Stars is a modern, all-in-one creative platform designed to empower models, photographers, makeup artists, agencies, and other creative professionals. Built to help individuals showcase their talent, grow their online presence, and access meaningful opportunities, Be Stars combines advanced digital tools with a vibrant, collaborative community. Whether you are an aspiring model, a seasoned photographer, a creative hobbyist, or an established agency, the platform provides everything you need to elevate your professional journey.
At its core, Be Stars focuses on giving every user the chance to be seen. With features like a customizable website builder, free domain, shop creator, and promotional placements, members can establish a polished and engaging online portfolio without any technical expertise. The platform also offers community spaces where users can post updates, join discussions, collaborate in groups, or communicate privately—fostering strong creative networks and long-term partnerships.
Beyond visibility, Be Stars ensures growth through tools such as content monetization, social media promotional channels, and a built-in chat messenger for seamless communication. These features help users connect with clients, expand their reach, and explore new income opportunities.
With a mission to support talent at every level and create a space where creativity thrives, Be Stars stands as more than a platform—it is a pathway for turning passion into professional success.
Demo Login Details
Admin Login Details
- URL https://bestars.pixelnx.com/login
- Email :demoadmin@pixelnx.com
- Password :demo@123#
Creator Login Details
- URL https://bestars.pixelnx.com/login
- Email :democreator@pixelnx.com
- Password :demo@123#
Star Login Details
- URL https://bestars.pixelnx.com/login
- Email :demostar@pixelnx.com
- Password :demo@123#
Fan Login Details
- URL https://bestars.pixelnx.com/login
- Email :demofan@pixelnx.com
- Password :demo@123#
Script Created Date:
Please check Live Preview:
Creative Author Portfolio:
Features
There are powerful and premium-level features packed into the Be Stars platform, designed for models, creators, photographers, and all creative professionals.
Features of the admin
- Dashboard
- Links Analytics
- User Management
- Membership Plans Control
- Sedcard Management
- Content Moderation
- Payment & Earnings Management
- Reports & Analytics
- Messaging Management
- Promotion & Spotlight Tools
Features of the App
- Personalized Dashboard with stats
- Links Analytics
- Profile Management
- Bring in smart wealth
- Share your Ideas with the world
- Device Friendly/Responsive
- User Friendly
- Lightweight
- Build your Sedcard with templates
- Real-time Chat Messenger
- Notifications & Alerts
- Create Individual Paid Posts
- Build Subscription Plans (Premium)
- Expand professional network easily

Mongodb Setup
1. How do you get MongoDB connection URL.
Step 1 : Sign Up in MongoDB, or if you already have an account, then Login.
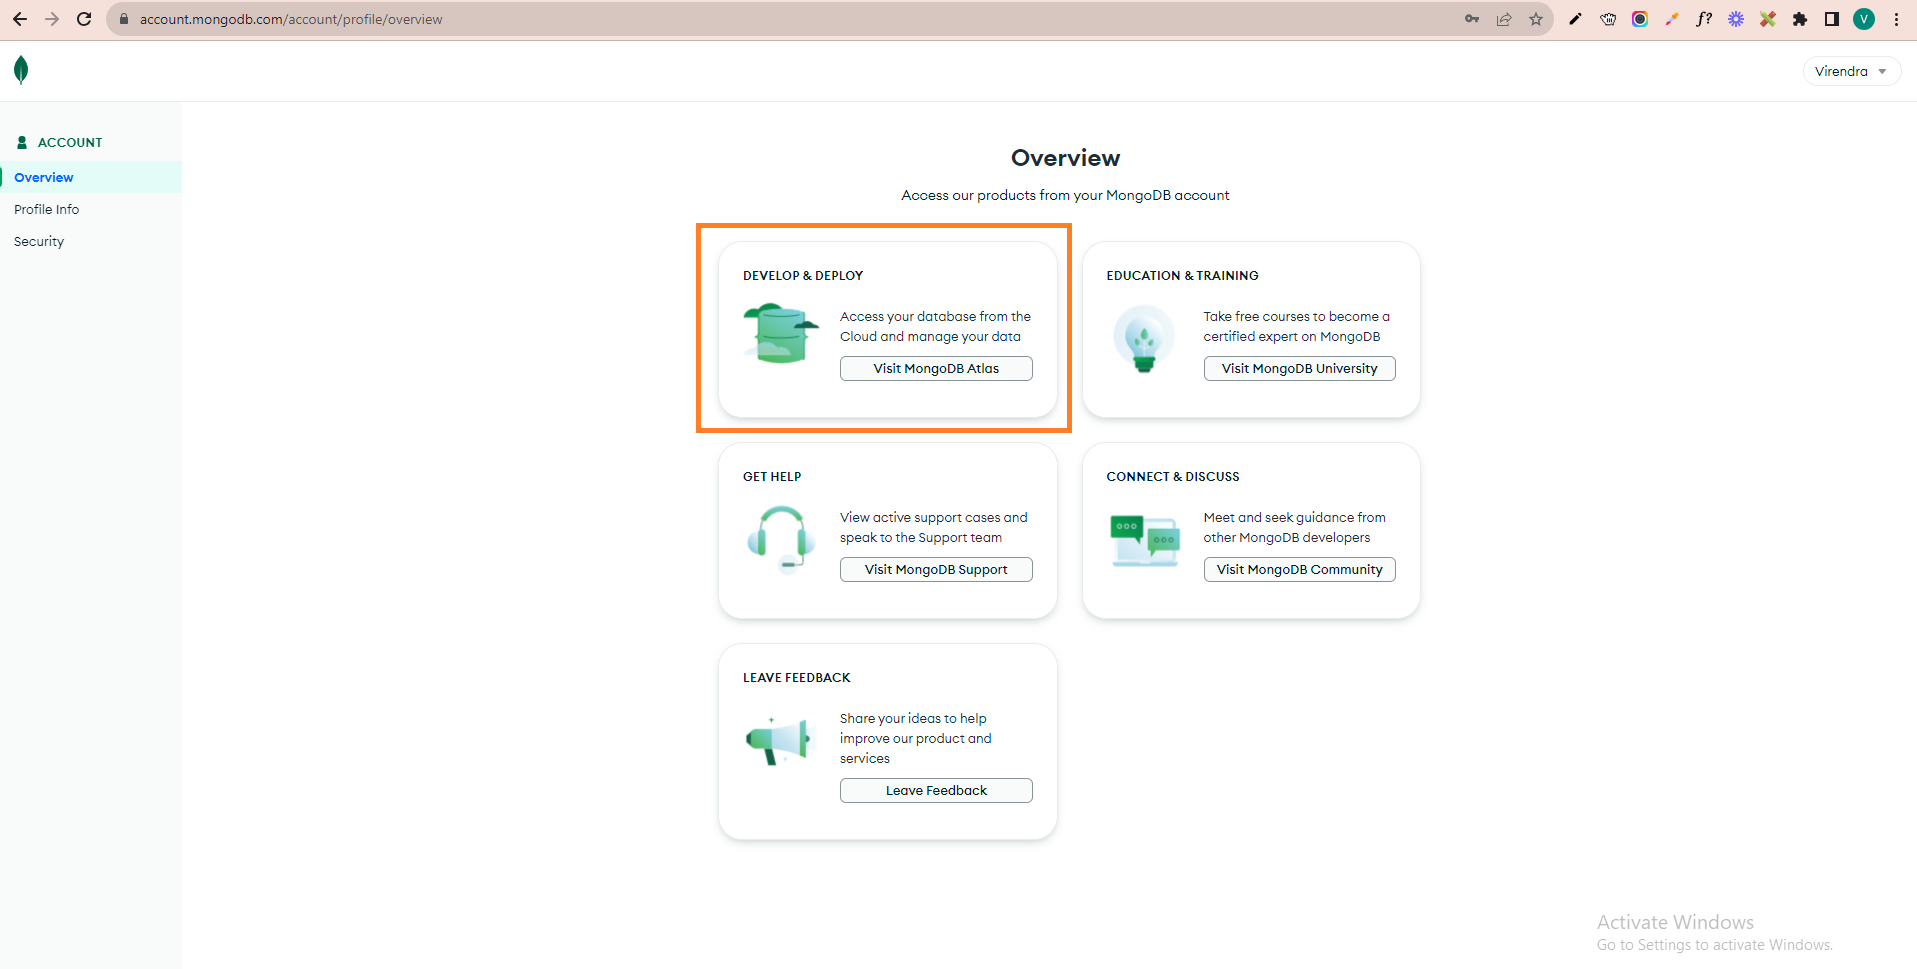
Step 2 : Login on Mongodb, then you will see the below screen. At this screen, you click on the first "visit MongoDB Altas" option.
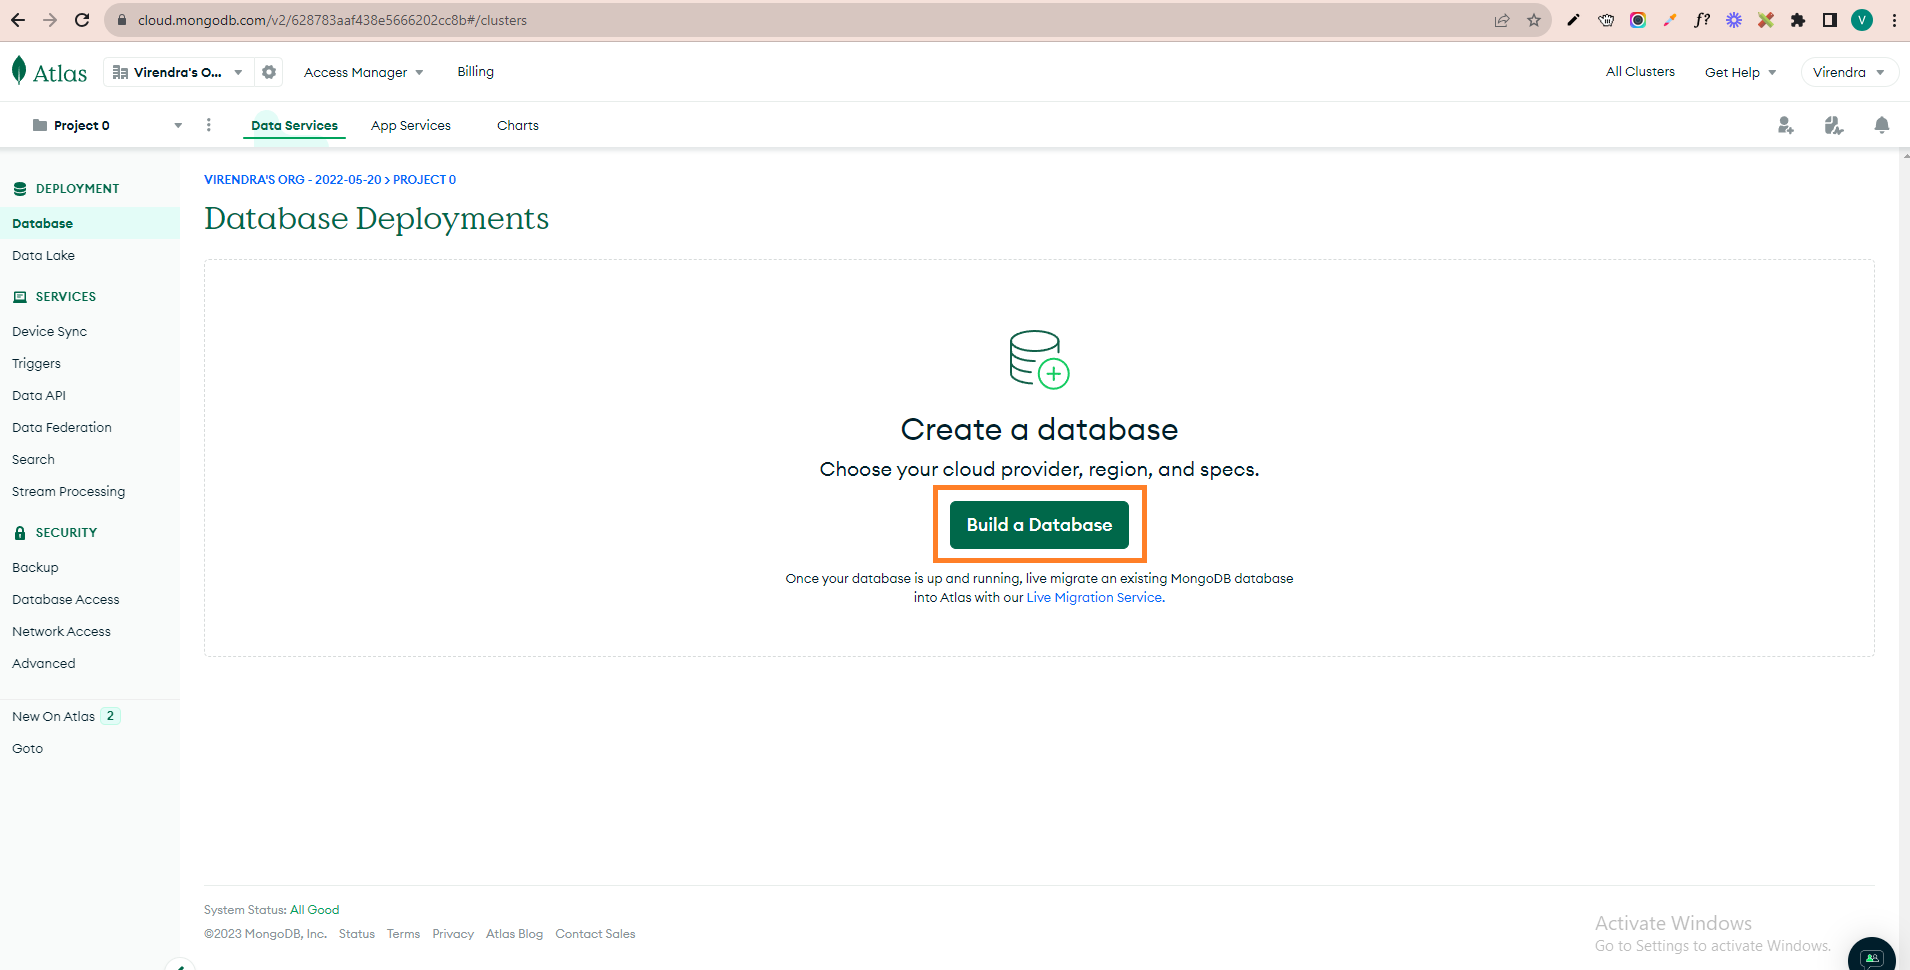
Step 3 : Now at this step, you have to create a database. Please click on "Build a Database," as shown in the screenshot.
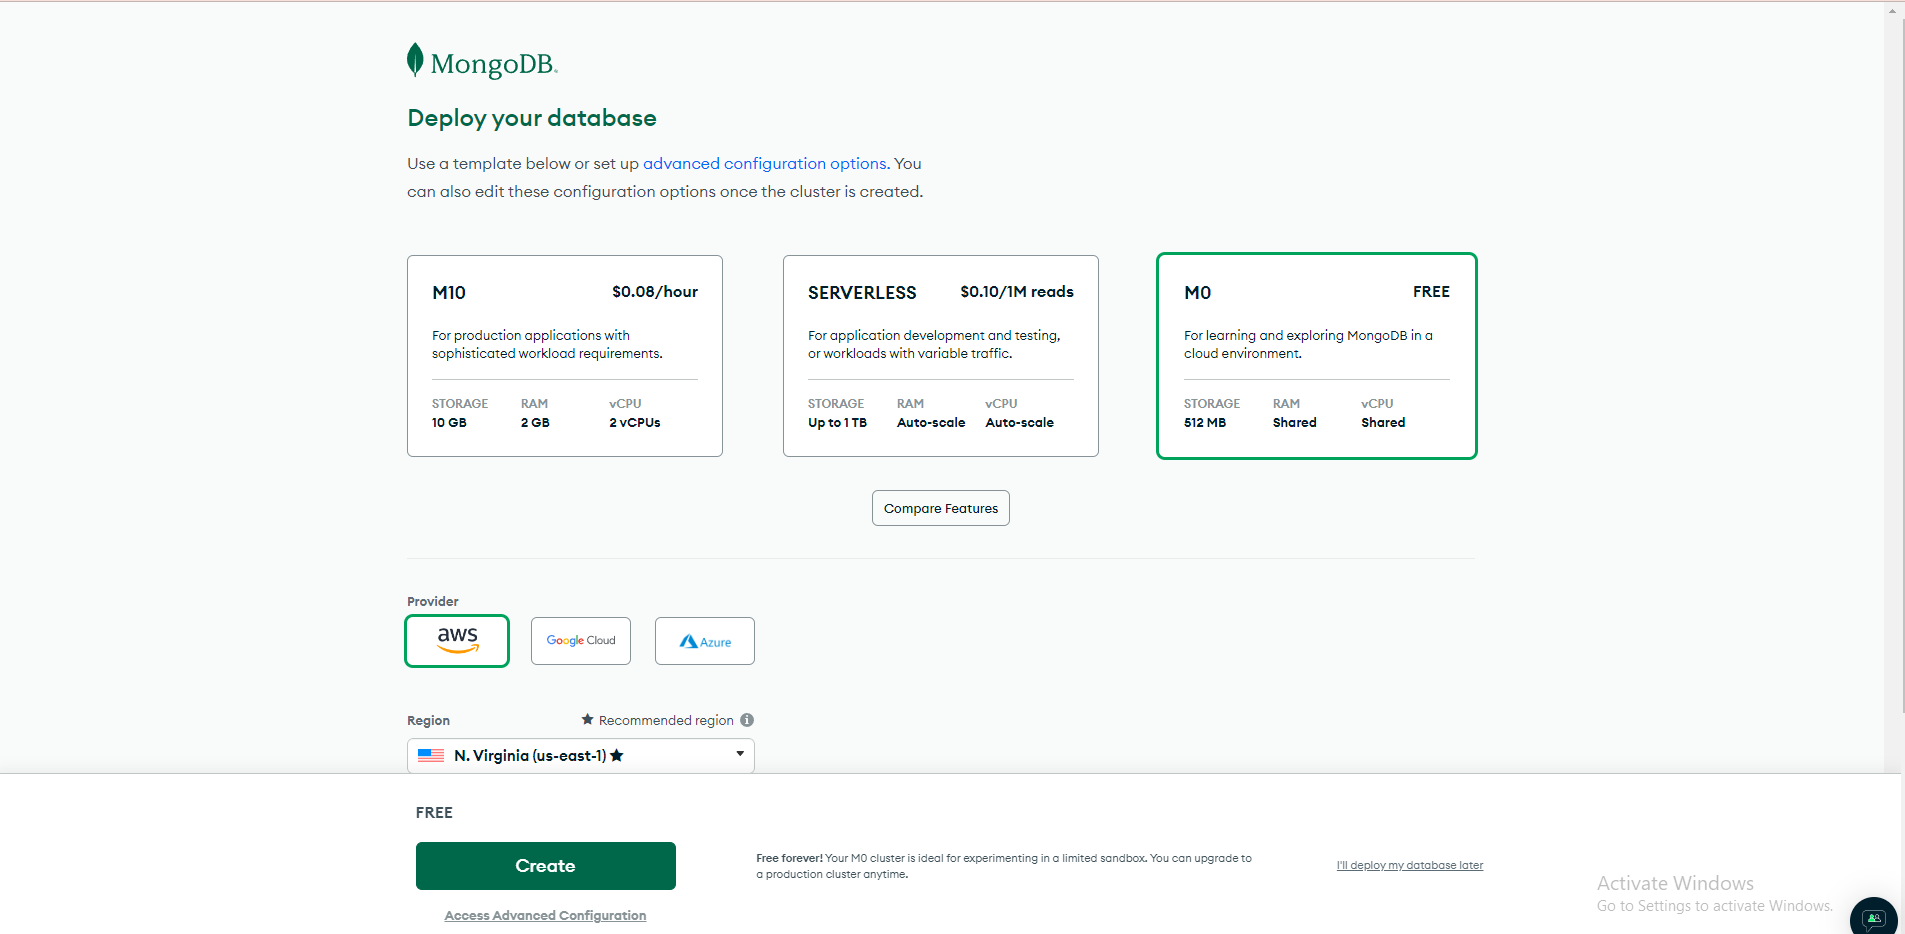
Step 4 : After that, select the free plan and click the Create button for the database. (later, you can upgrade your database plan as needed).
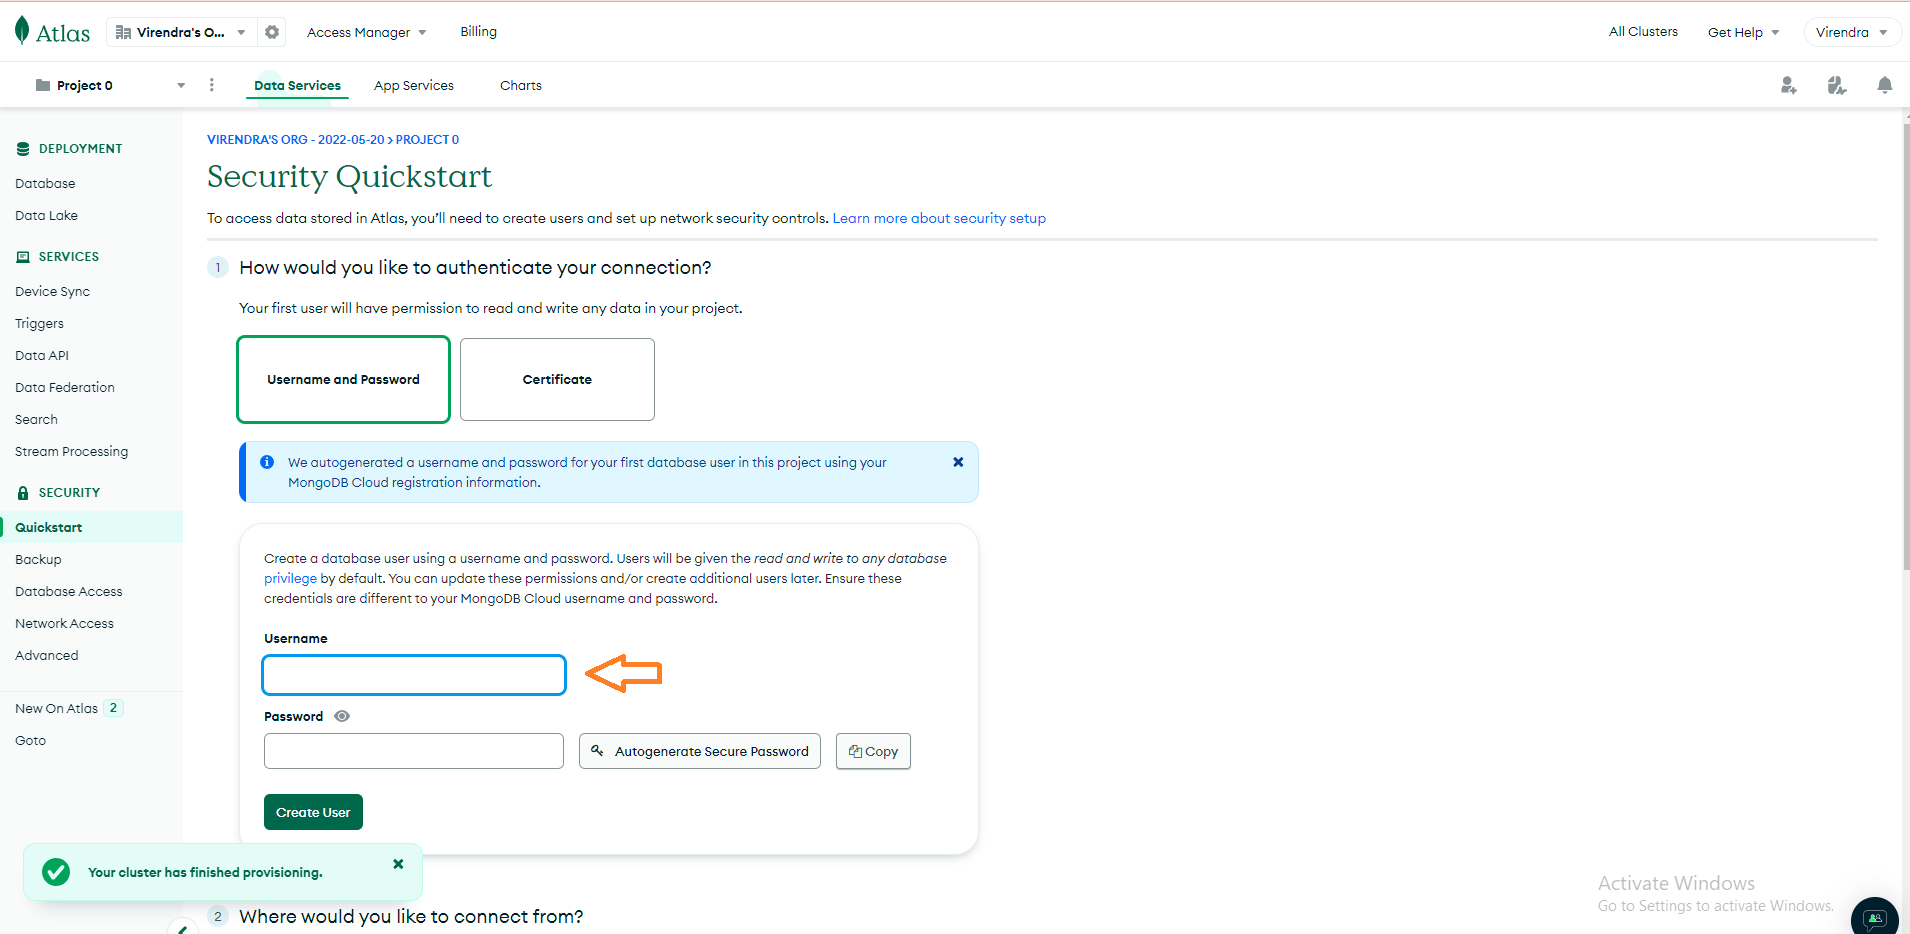
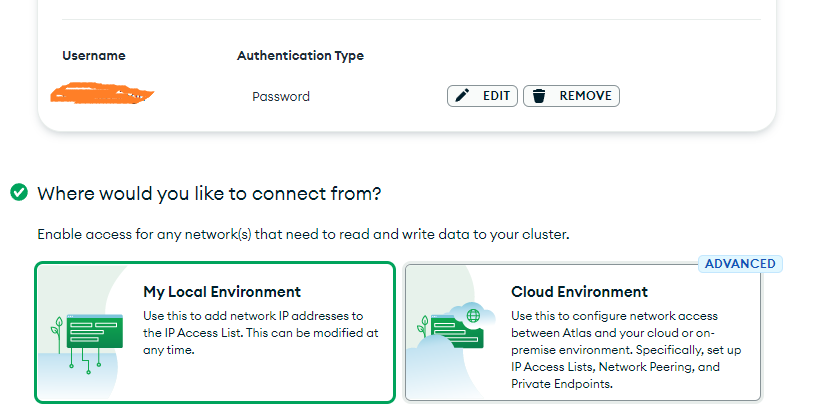
Step 5 : Firstly, create a user for the database at this step, update the details and create the user.
Step 6: Once you create a user, you will see this screen.
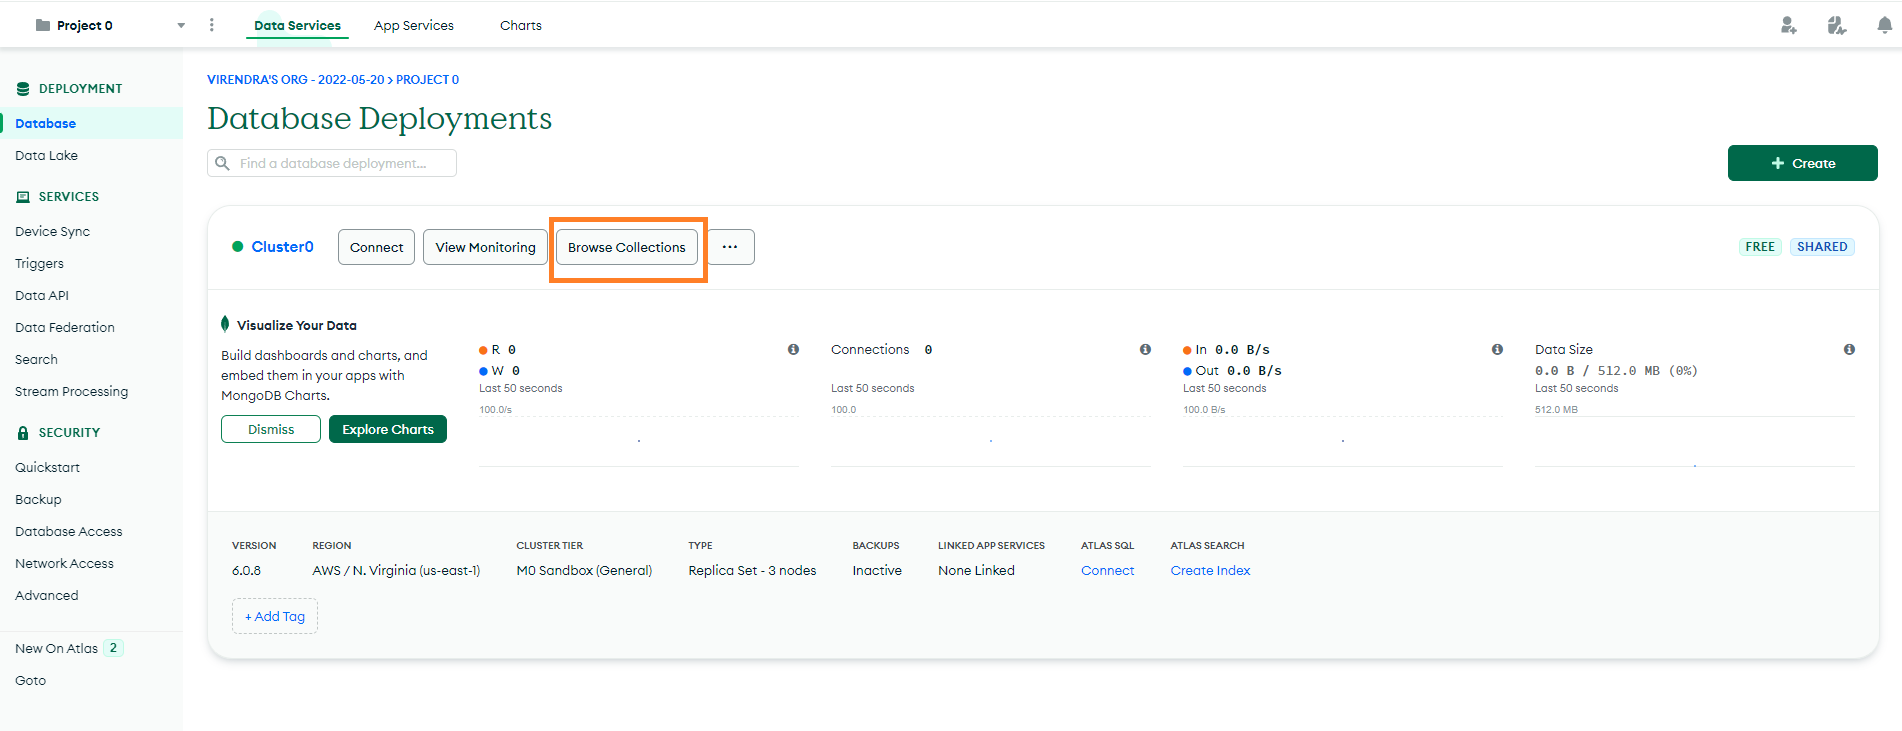
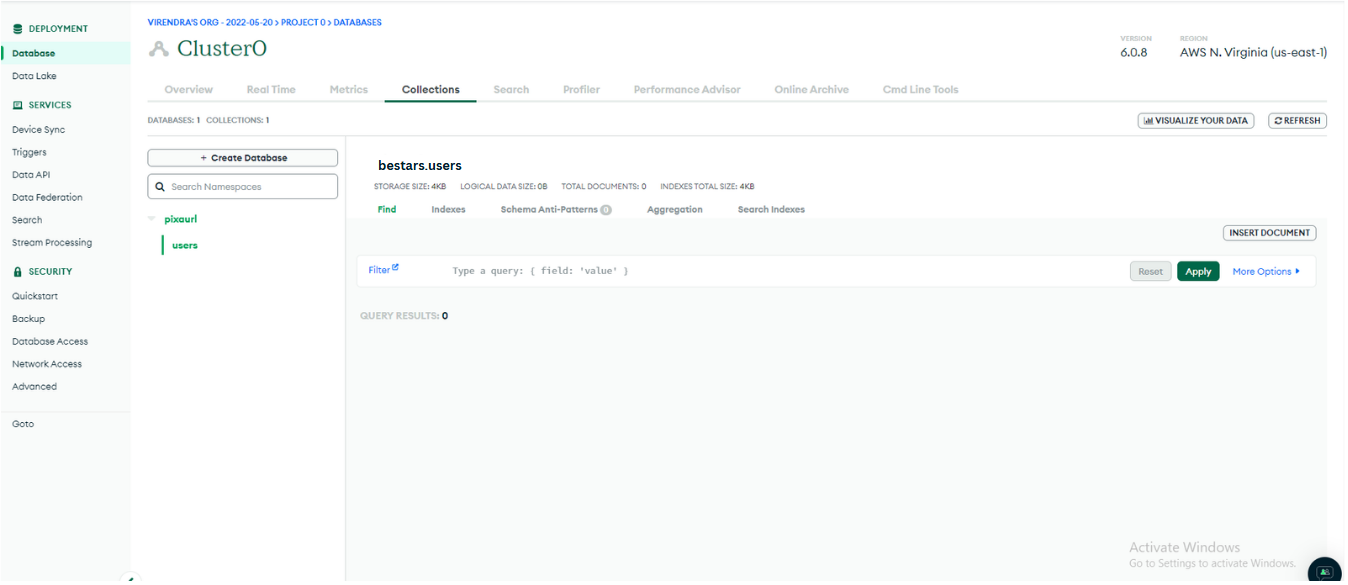
Step 7: Now click on the database showing in the left sidebar. Then click on the "Browse Collections" option.
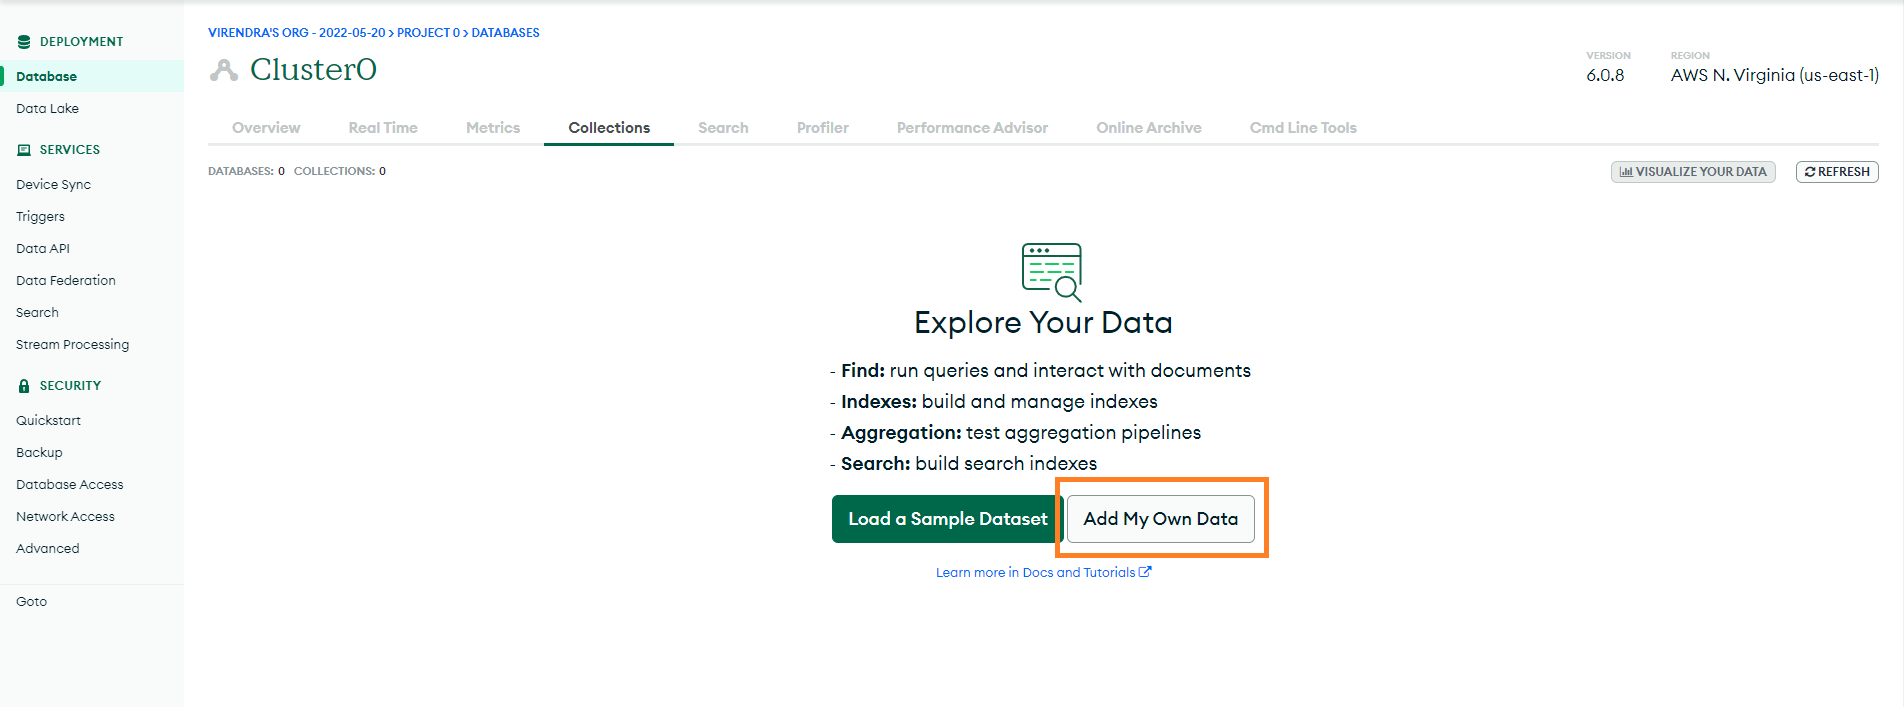
Step 8: Click on the "Add My Own Data" option at this step.
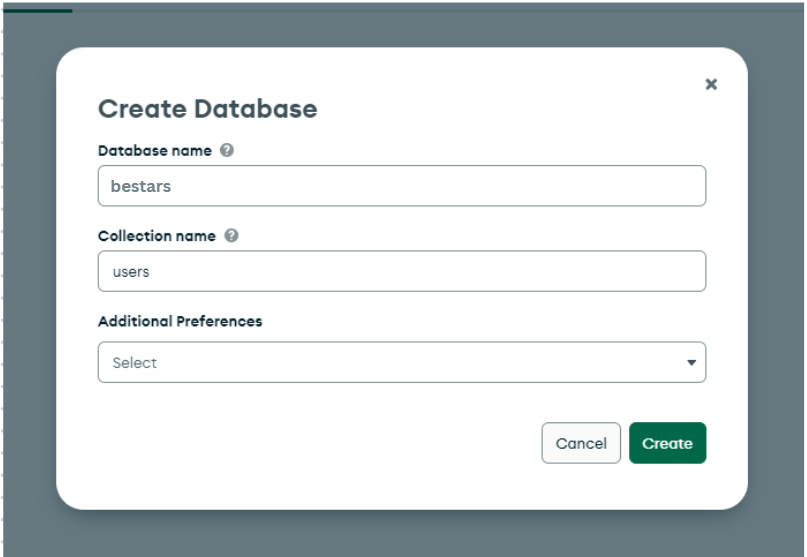
Step 9: Now add your database information.
Step 10: Once the database has been created, you will get this screen.
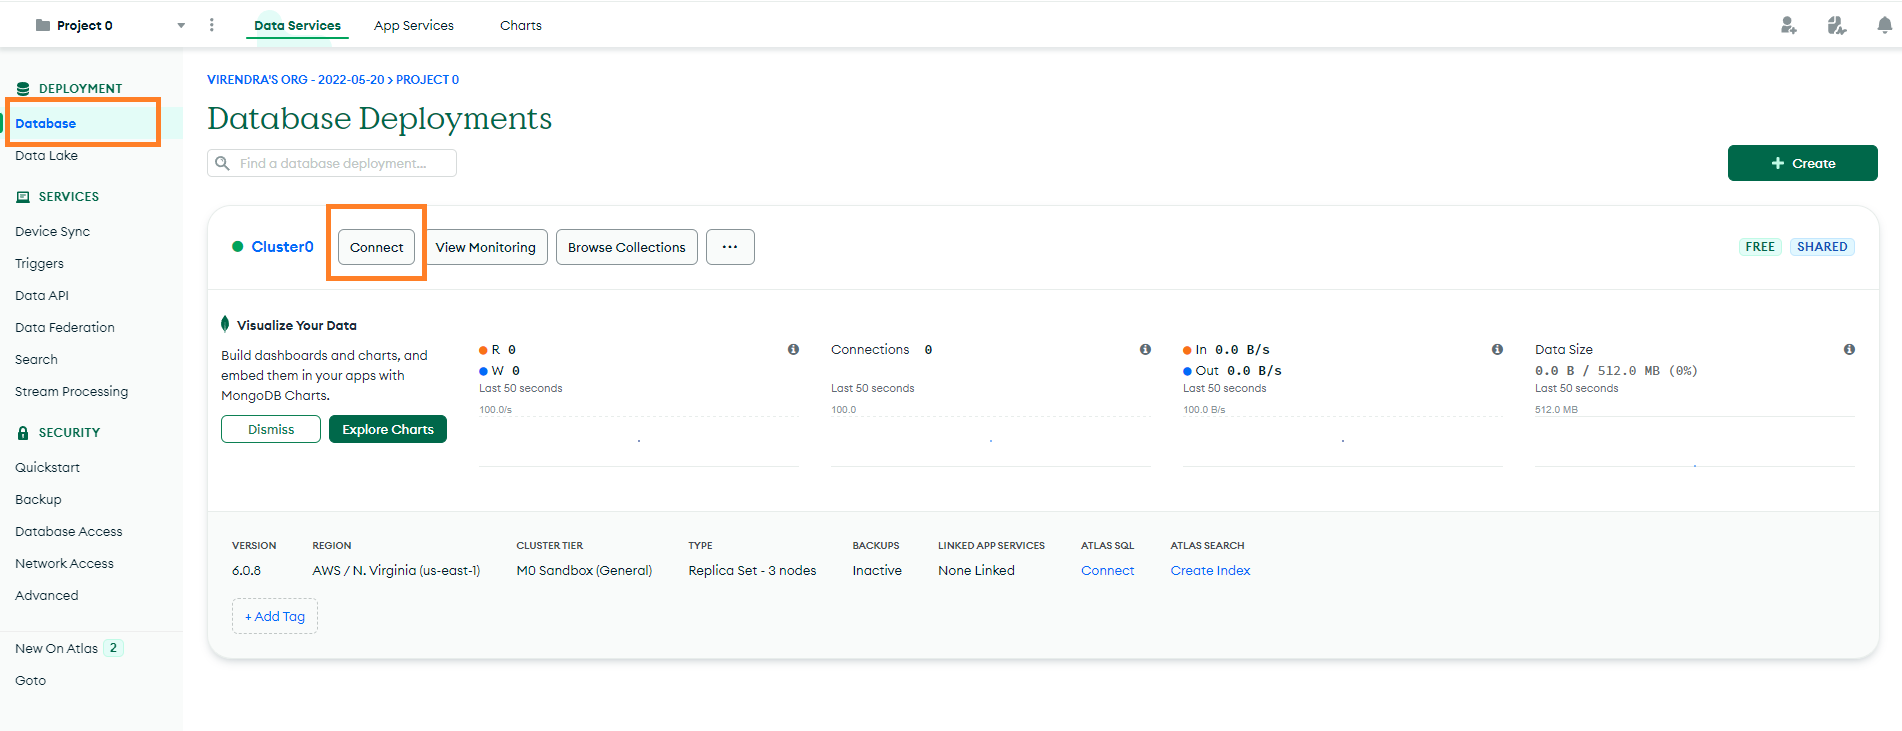
Step 11: Now click on the "database" menu, then click on the "connect" option.
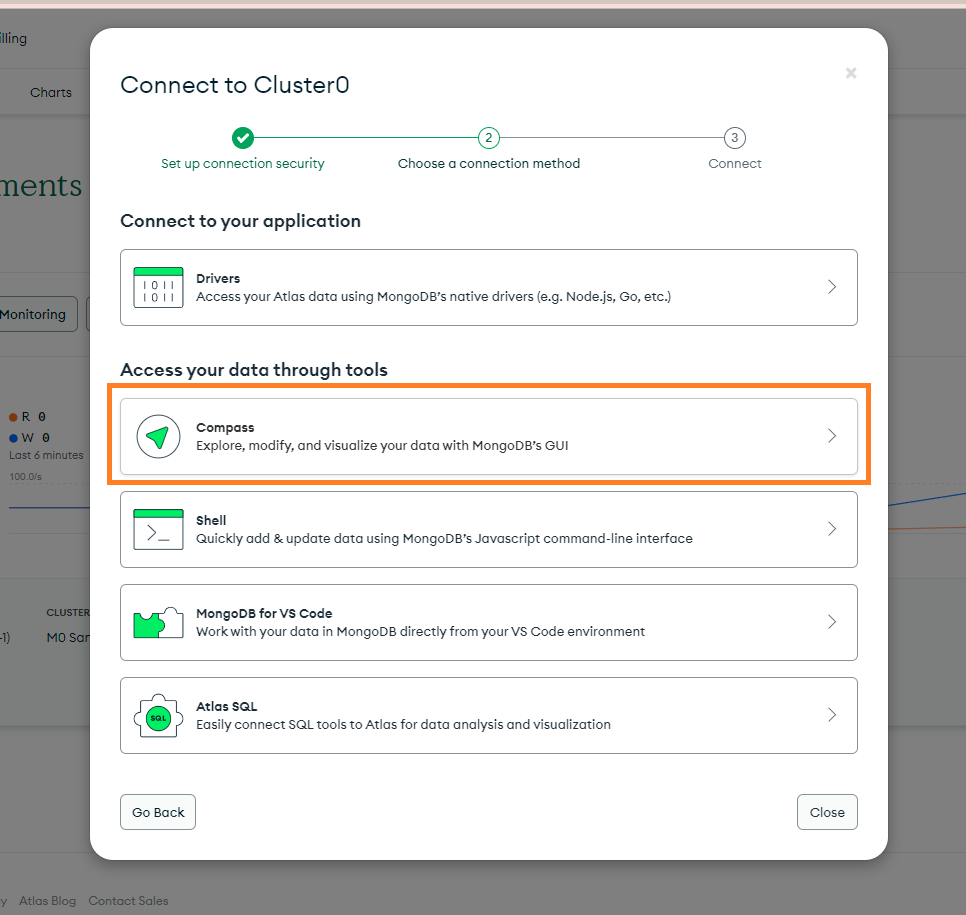
Step 12 : In this model, please click on the compass option.
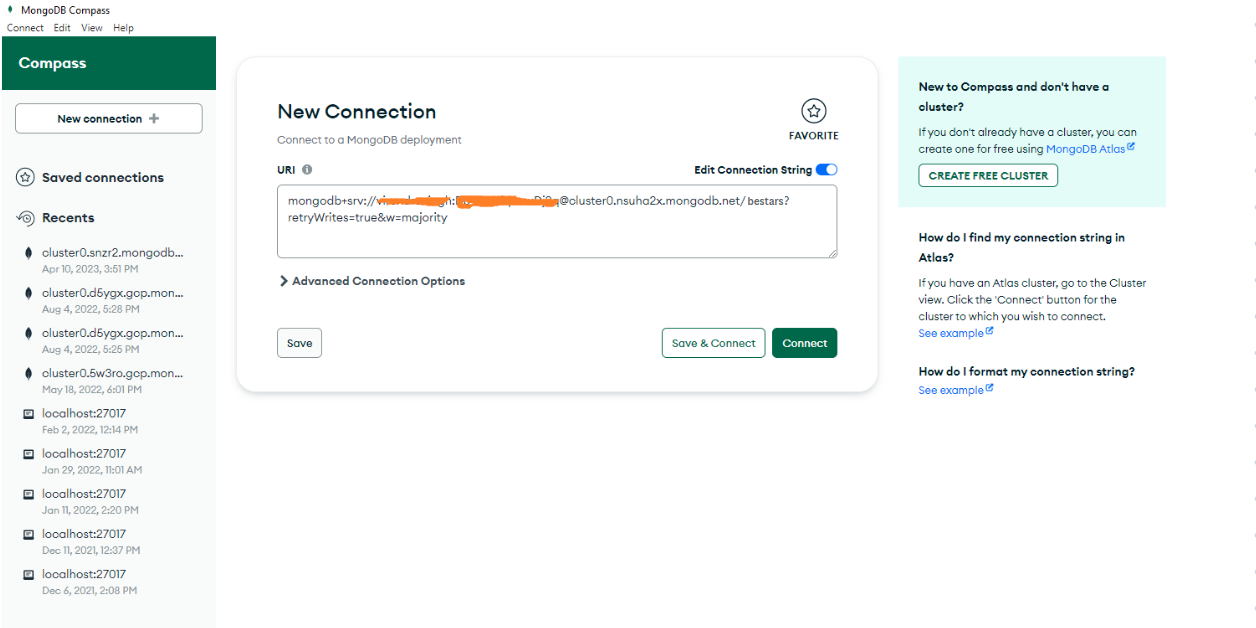
Step 13 : In this model, you will see the connection URL. Copy this URL.
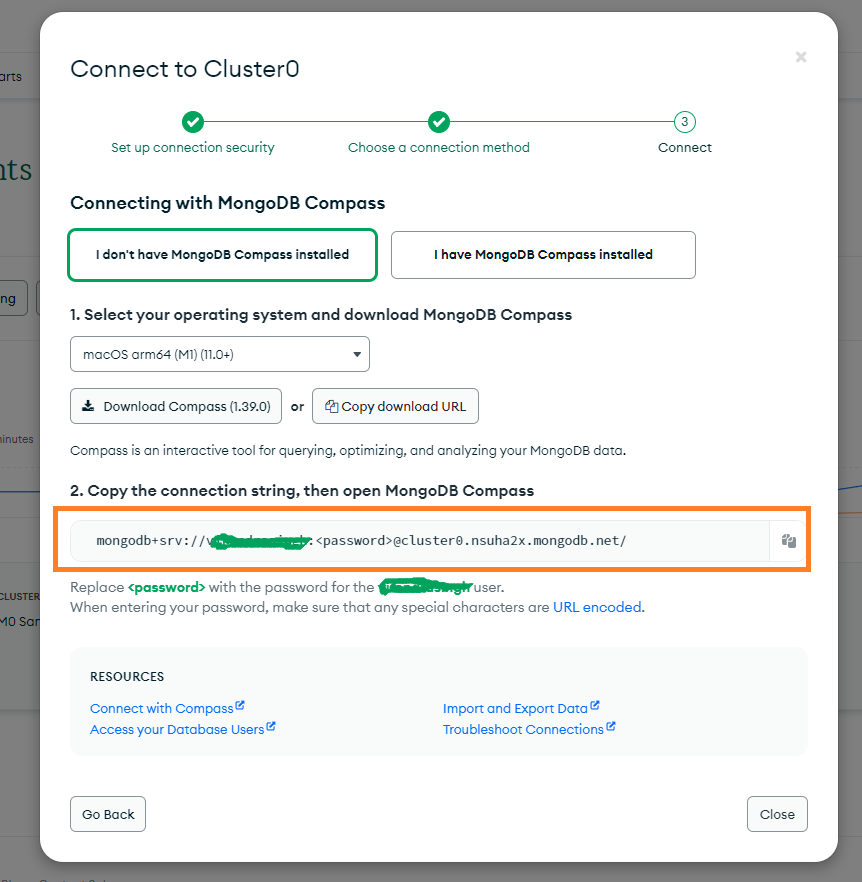
Step 14 : Now you will have your MongoDB connection URL.
| mongodb+srv://bestars:<password>@cluster0.nsuha2x.mongodb.net/ |
In this URL you have to add your username, password, and database name.
For Example :
Username = bestars, password = bestart123, Database name : = bestars
The final MongoDB connection URL will be like this (Please update the correct details in this connection URL).
| mongodb+srv://bestars:pixausertest123@cluster0.nsuha2x.mongodb.net/Bestars?retryWrites=true&w=majority |
You have to add the MongoDB connection URL to the env.developement / env.production for backend.
Demo Import
Note
Step 1 : Open Mongodb compass and past Mongodb connection URL, and then connect.
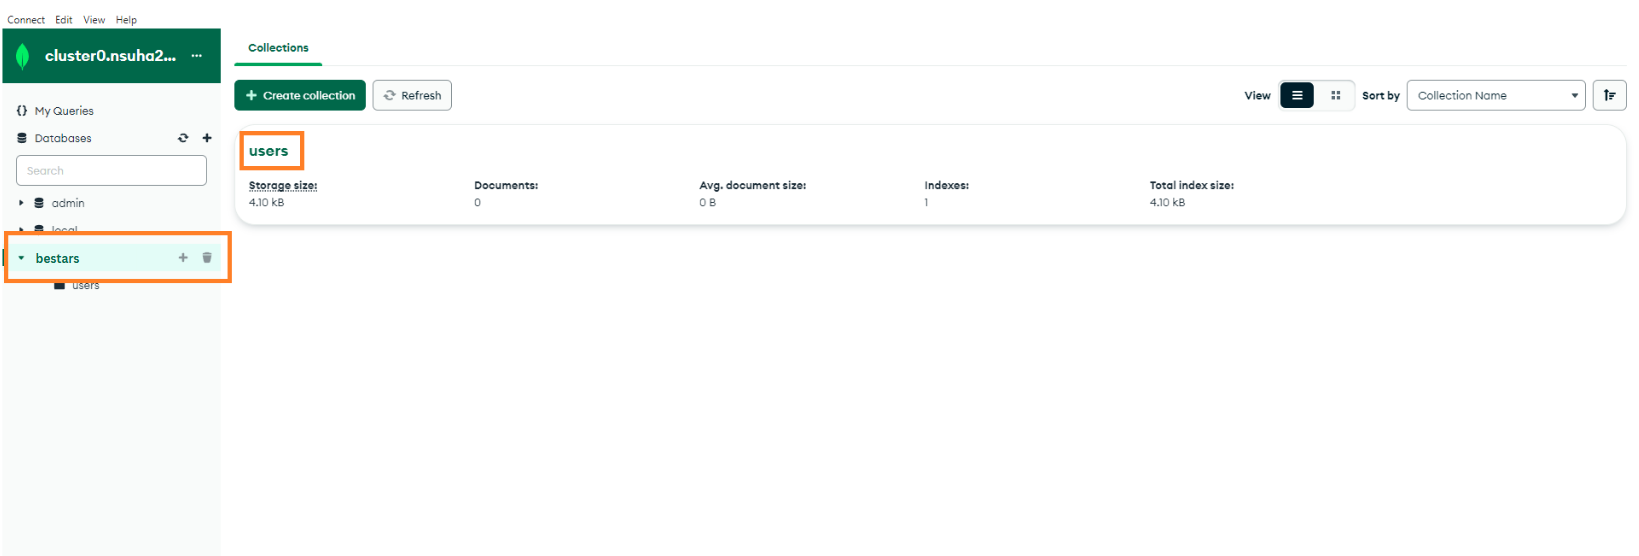
Step 2 : Please click on the database name. In our case is, "bestars" shown in the screenshots.
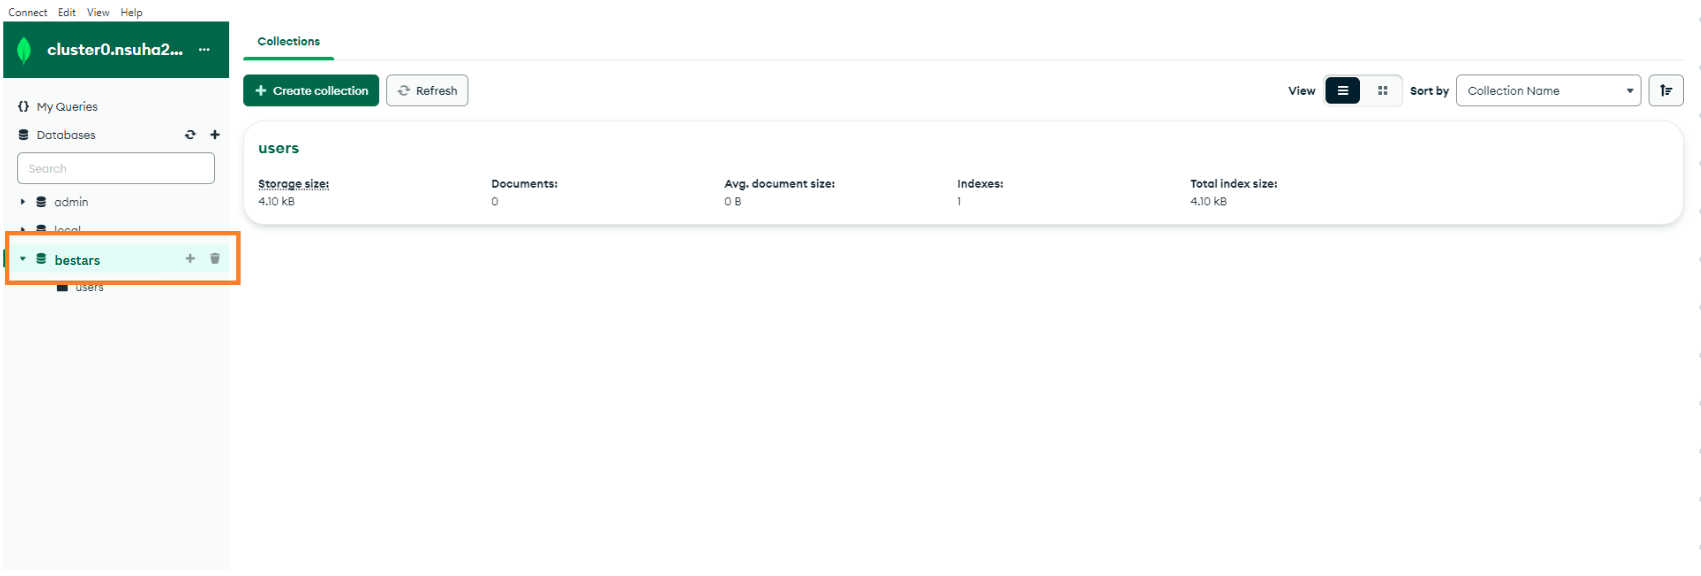
Step 3 : After that click on the "users" collection
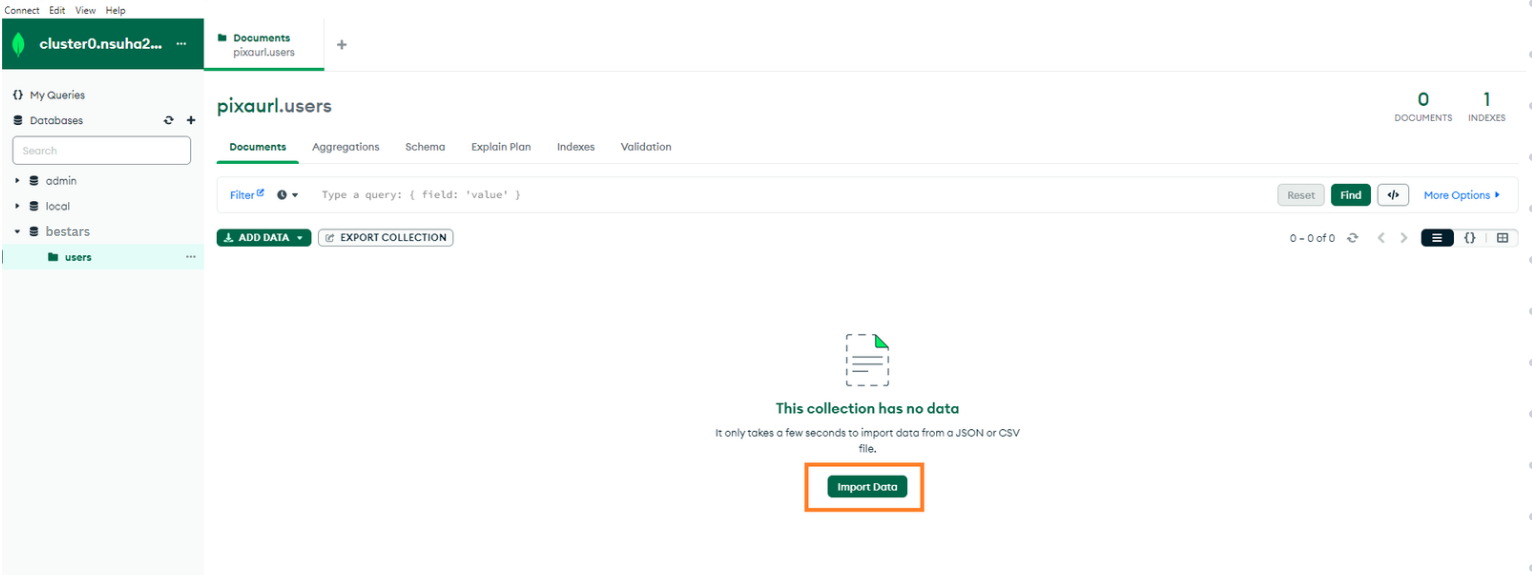
Step 4 : Import the user data in the users collection. To download the user.json file click here
Step 5 Once the demo data has been imported successfully, copy the MongoDB connection URL and save it securely
Bestart Script Installation
Note
• Node.js must be installed on your server.
• MongoDB database is required.
• Node.js version 18 or higher recommended.
Check Node version:
node -v
Project Structure
After extracting Bestart package you will get two main folders:
- frontend – Client application (Next.js)
- backend – API server
Frontend Setup
Step 1 Navigate to frontend folder
cd frontend
Step 2 Install packages
npm install --legacy-peer-deps
Step 3 Setup Configuration Files
You will find the following files inside frontend:
- appdata.js
- .env.development
- .env.production
Edit appdata.js and configure:
- Application name
- Default site URL
- Theme and global settings
- SEO base configuration
- supportURL & supportEmail
- Social Media Links
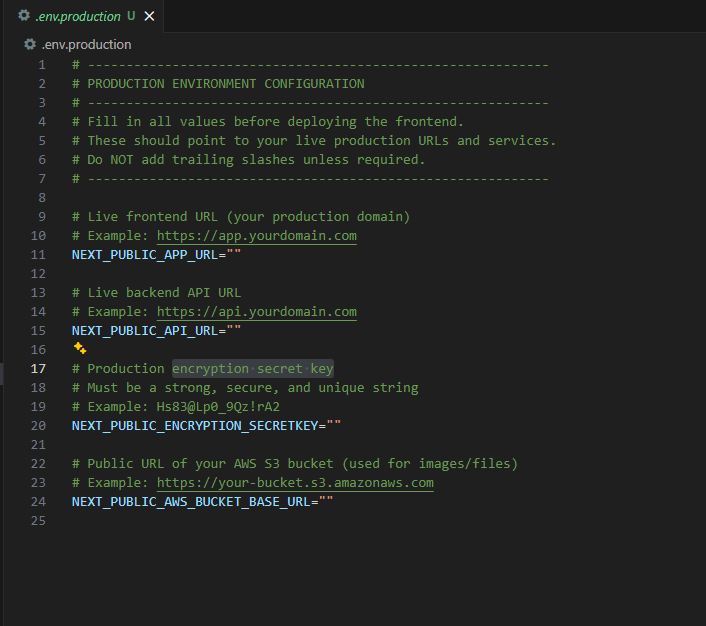
Edit .env files for environment-based settings:
- API base URL
- AWS resource URLs
- Encryption Secret Key
Step 4 Run Frontend
Local: npm run dev
Live:
npm run build
npm start
Backend Setup
Step 5 Navigate to backend folder
cd backend
Step 6 Install dependencies
npm install --legacy-peer-deps
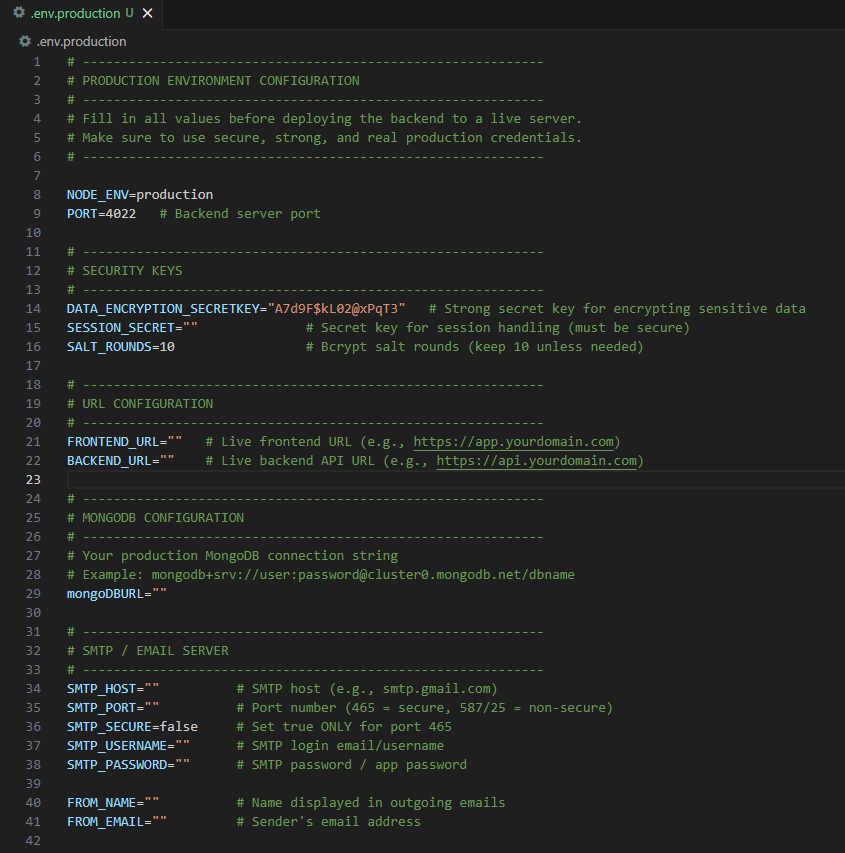
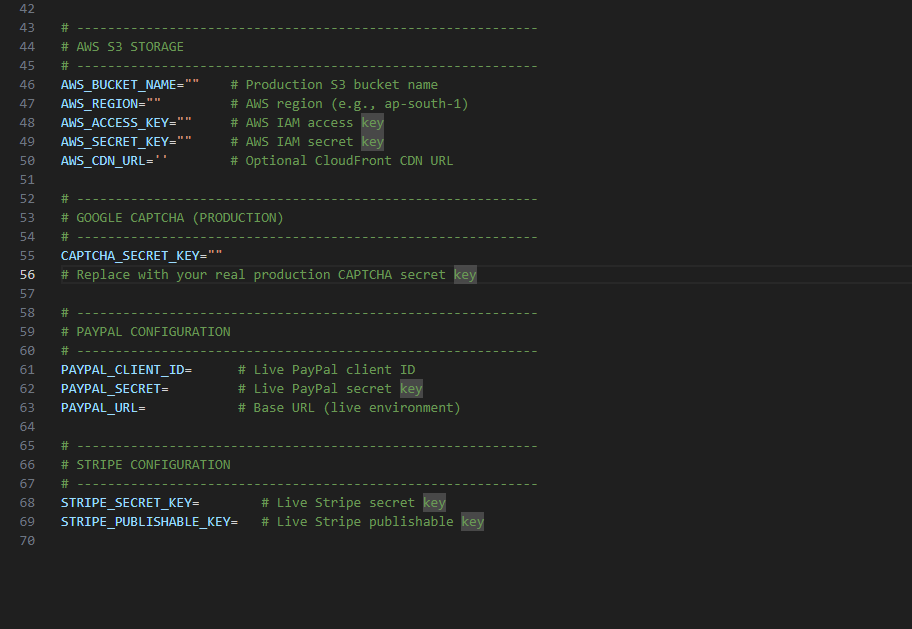
Step 7 Backend Configuration
Inside backend folder locate the following files:
- appdata.js
- .env.development
- .env.production
Edit appdata.js (Application & Plan Configuration):
- Application name
- ContactLink
- Plan Data
- CreditValue
- ReferrerPercentage
IMPORTANT:
When you run the project on the live server for the first time using npm start, the membership plans defined inside appdata.js will be automatically created in your Stripe account.
Make sure plan pricing, currency, and names are finalized before deploying live.
Edit environment files (.env):
Add ALL third-party credentials and secret keys in the environment files. These values control payment gateways, emails, cloud storage and security.
- MongoDB URL
- Stripe API Keys (Required)
- PayPal credentials
- AWS access keys
- Email SMTP Details
PAYMENT NOTE:
- Stripe is mandatory for running the membership system.
- Stripe and PayPal are used for creator subscription payments.
- You must configure Stripe credentials to run the application.
- If PayPal is not configured, only Stripe will remain active.
Database Setup
Step 8 MongoDB Configuration
Paste the connection string (Which is created earlier) into the .env.development and .env.production file in backend folder. The remaining collections will be created automatically when the backend server starts. Use the login credentials provided below.
- Email : demoadmin@pixelnx.com
- Password : demo@123#
- Email : democreator@pixelnx.com
- Password : demo@123#
- Email : demostar@pixelnx.com
- Password : demo@123#
- Email : demofan@pixelnx.com
- Password : demo@123#
For Admin
For Creator
For Star
For Fan
Step 9 Run Backend Server
Local Development:
npm run dev
Live Server:
npm start
Completion
Check:
- ✅ Frontend loads
- ✅ Backend responds
- ✅ Database connected
- ✅ Email services working
- ✅ Upload working
- ✅ SEO ready
Bestart is now installed successfully 🎉
Admin Dashboard
The BeStars Admin Dashboard gives full control over Creators ,Stars, Fan homepage content, earnings, subscriptions, and reports. It allows system administrators to manage the entire platform effectively and securely.
Dashboard
The dashboard shows simple analytics for monitoring the platform performance.
- Total Users
- Active Users
- In Active Users

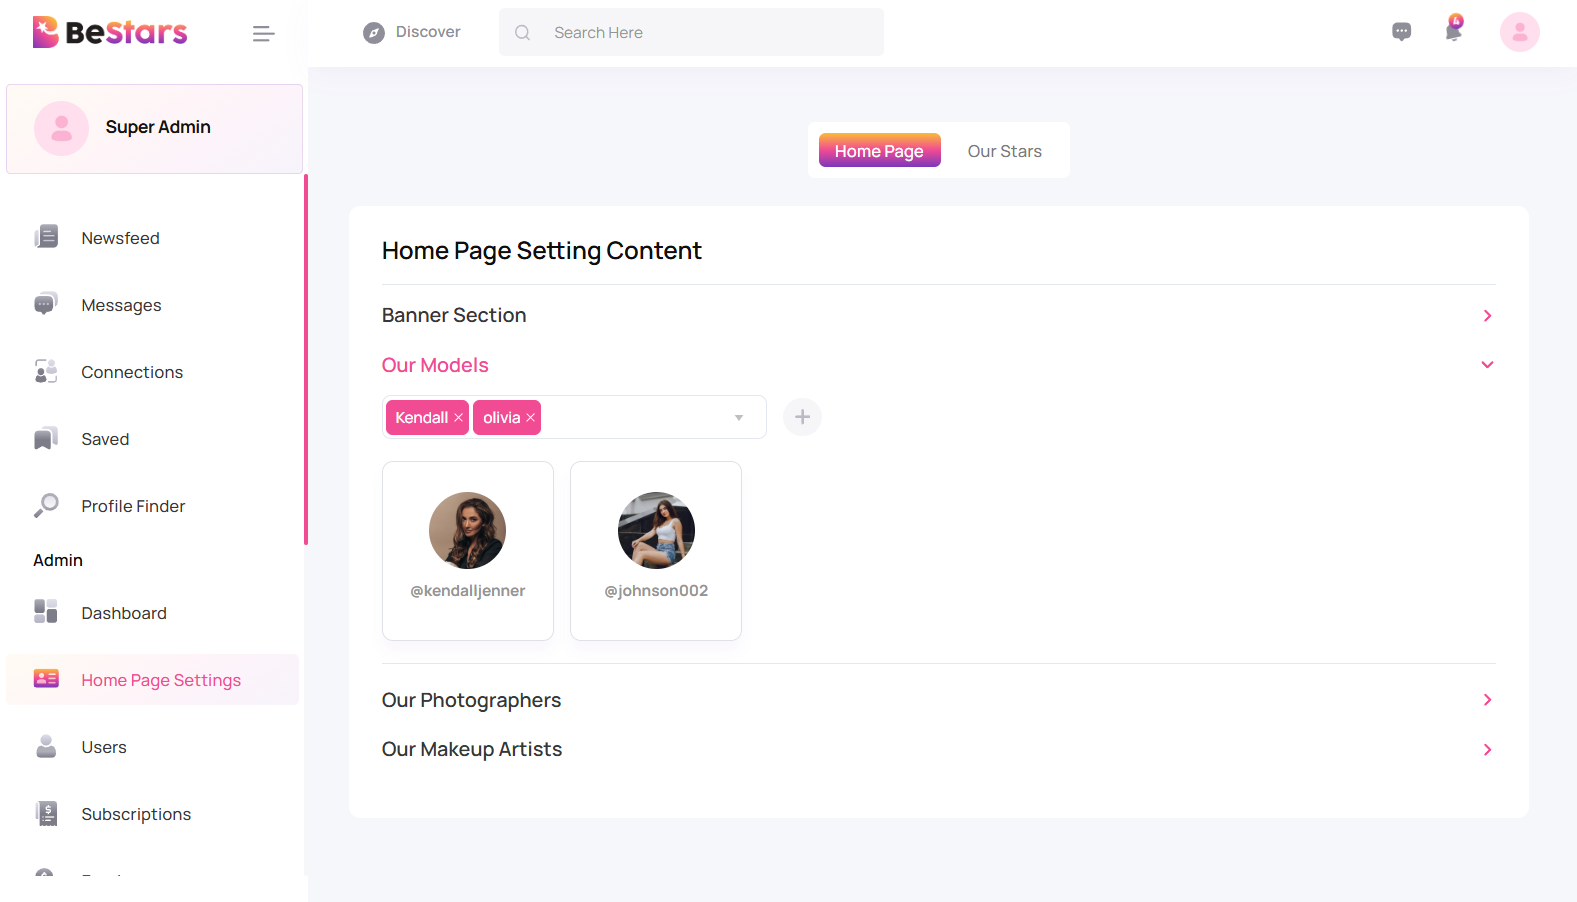
Home Page Settings
From this section, the admin can fully control the BeStars homepage layout and content. This is where the homepage visuals and creator showcases are managed.
Homepage Banner Management
Admin can select users to display in the main banner section of the homepage. Only users who have created a Sed Card are available for selection.
Admin can:
- Select multiple creators for banner display
- Remove or replace displayed users
- Control visibility instantly
- Show verified creators only
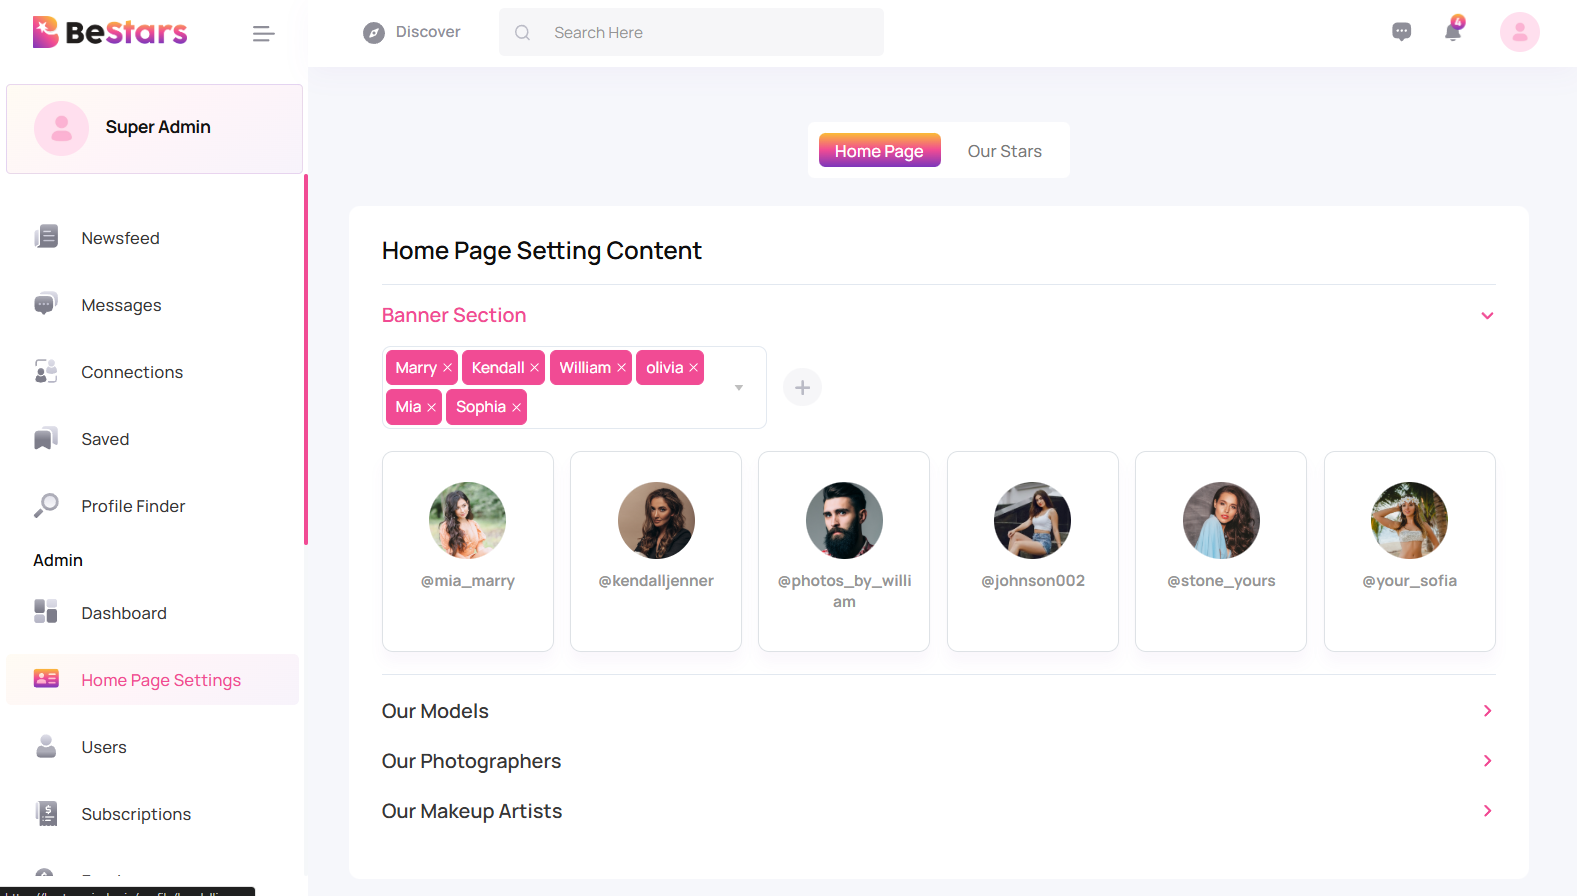
Homepage Category Management
Admin can manage which creators appear under professional categories on the homepage. All creators listed here must have an active Sed Card.
- Our Models – Displays professional models
- Our Photographers – Displays verified photographers
- Our Makeup Artists – Displays makeup artists
For each category, the admin can select multiple users and remove them anytime.
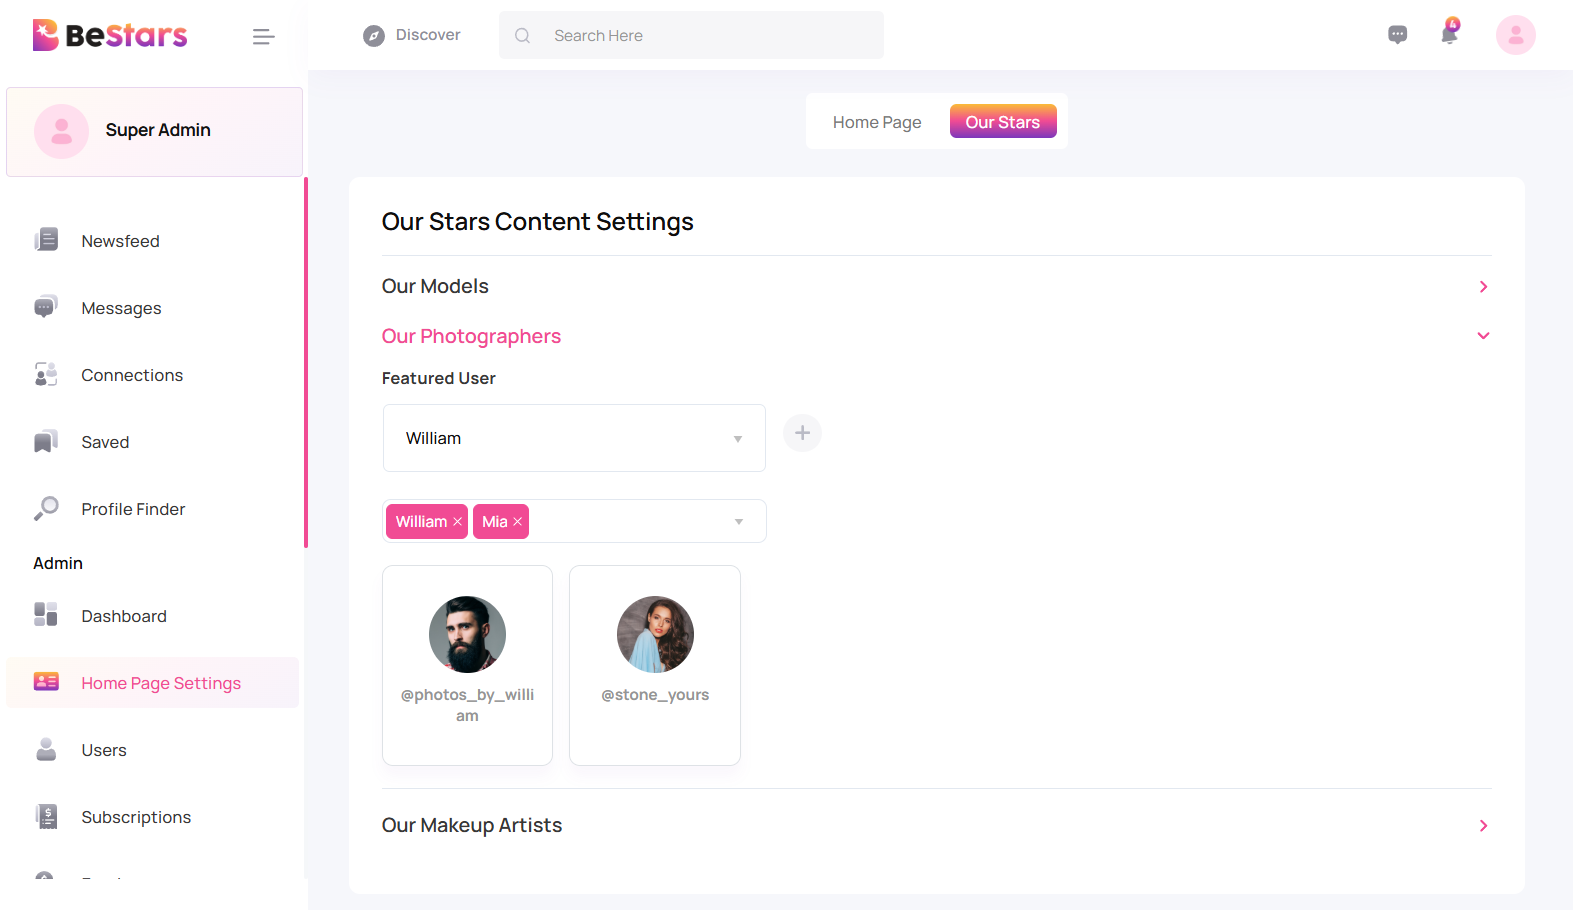
Our Stars Page Settings
This section controls the content displayed on the "Our Stars" page. Admin can organize stars by profession and manage visibility.
- Assign creators to professional categories
- Choose multiple stars per category
- Select one featured star for highlight
- Update or change featured star anytime
- Remove stars without deleting accounts
The highlighted star receives extra visibility across the homepage and star listing pages.
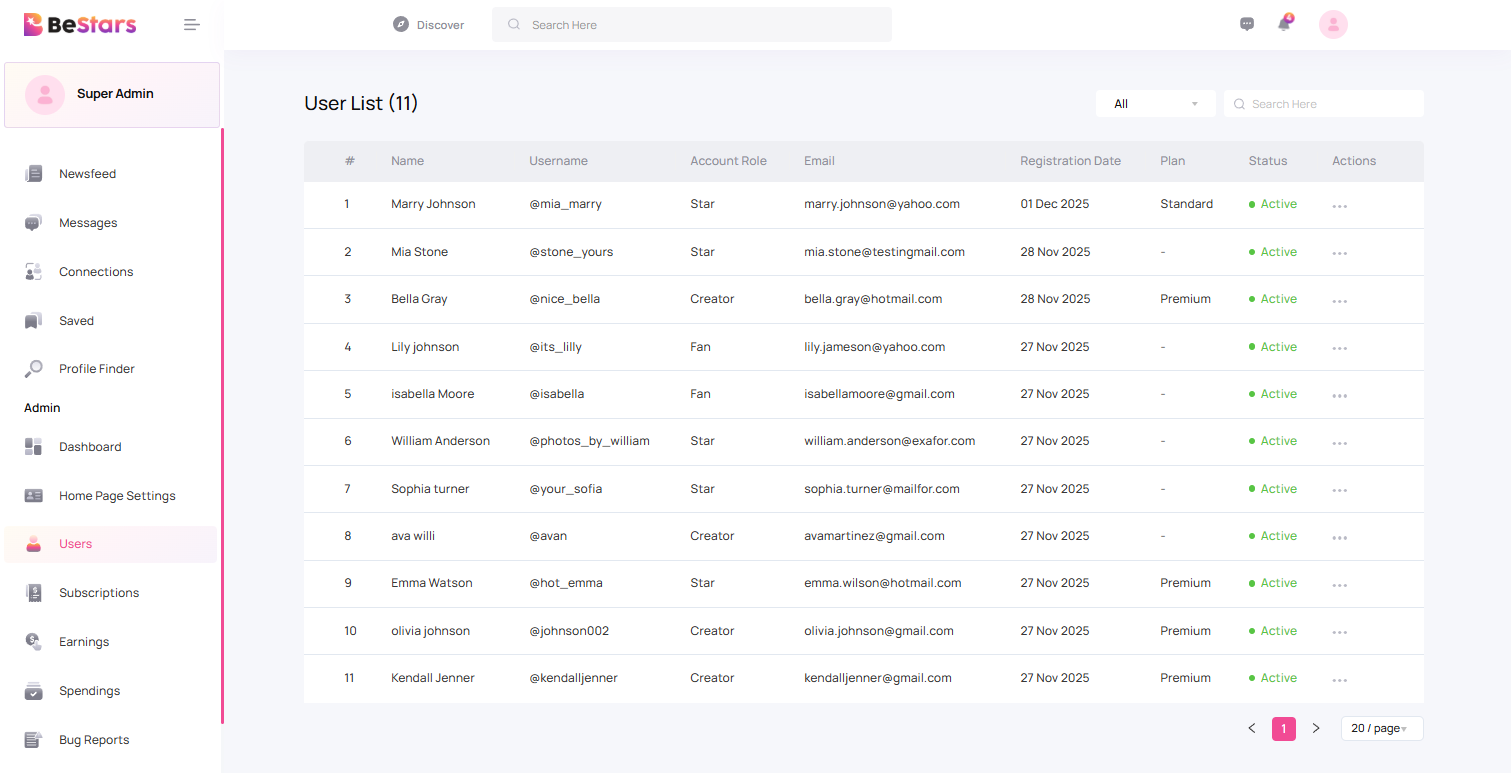
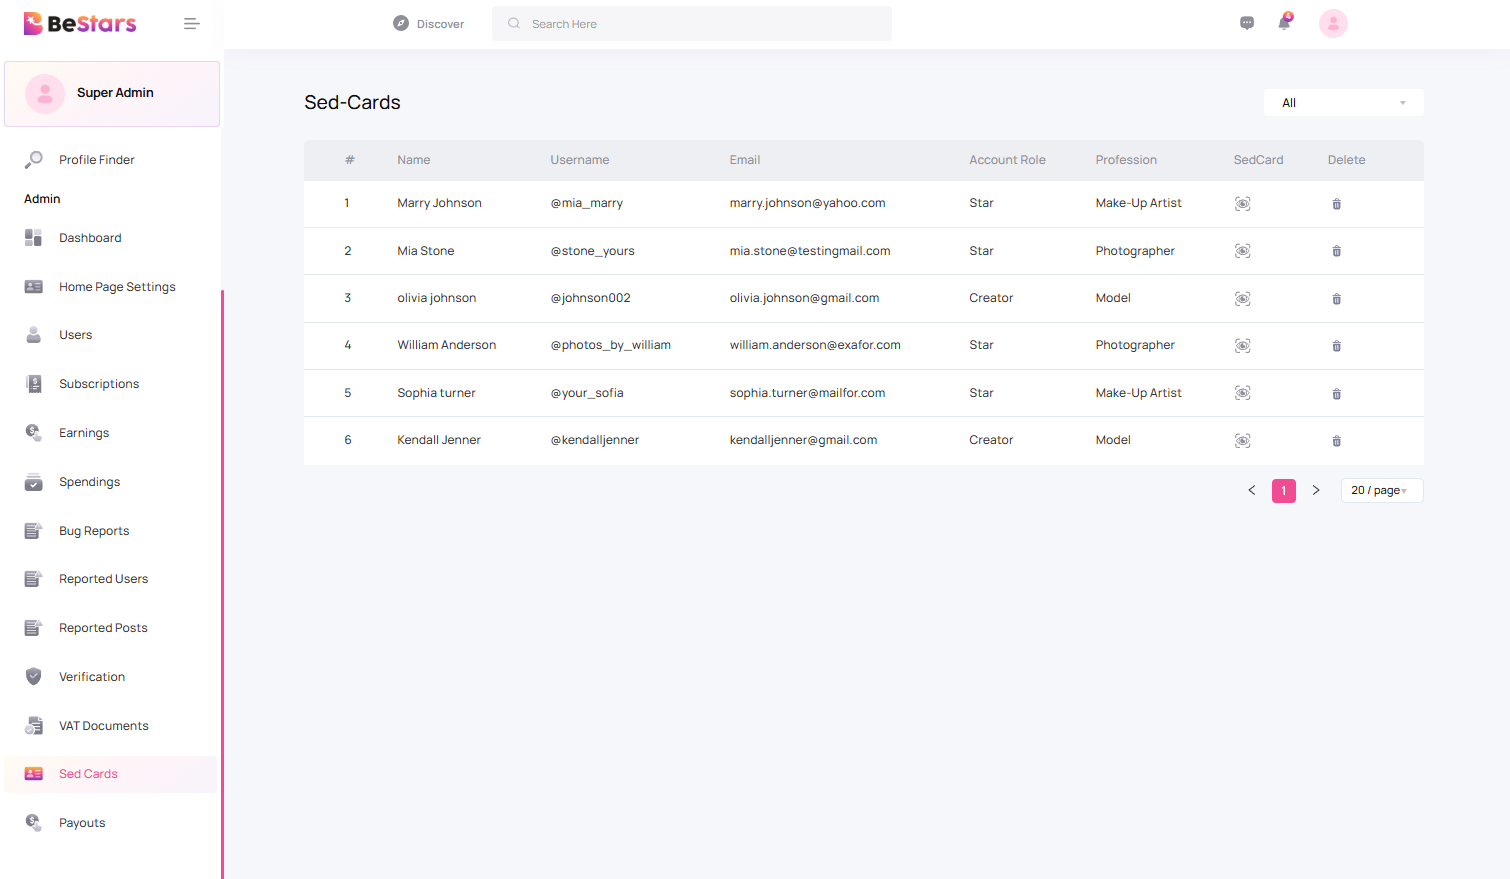
Users
This section allows the admin to manage all registered users and creators. Admin can update user details, control access, assign subscriptions, and manage creator accounts.
User Management Features
- Edit user profile information
- Change account status (Active / Inactive / Blocked)
- Assign or update subscription plans
- Verify users and approve creator access
- Manage profession category
- Change account role (User / Creator / Admin)
- Reset or update the password
- View linked Sed Cards
Quick Actions
- Login as User
- Suspend Account
- Delete User
- Activate / Deactivate User
- Force Password Reset
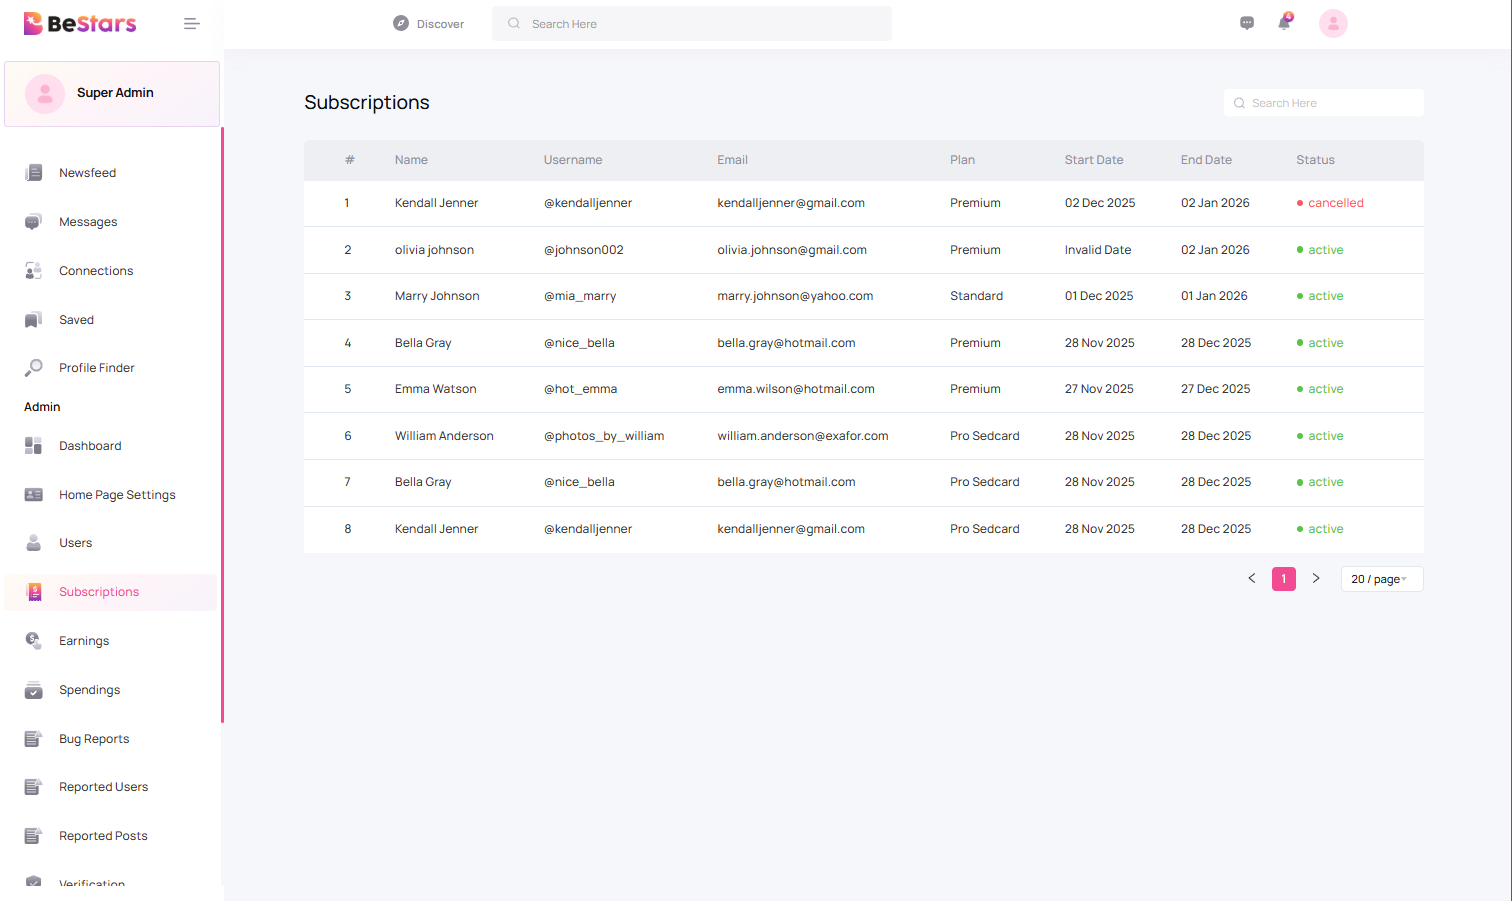
Subscriptions
This section displays all subscription purchases including membership plans and Sed Card purchases. Admin can track which users and creators have active or expired subscriptions.
Subscription Overview
Admin can monitor complete transaction history for:
- Membership plan purchases
- Sed Card purchases
- Active subscriptions
- Expired subscriptions
The admin can clearly see which users have purchased Membership Plans and which creators have purchased Sed Cards.
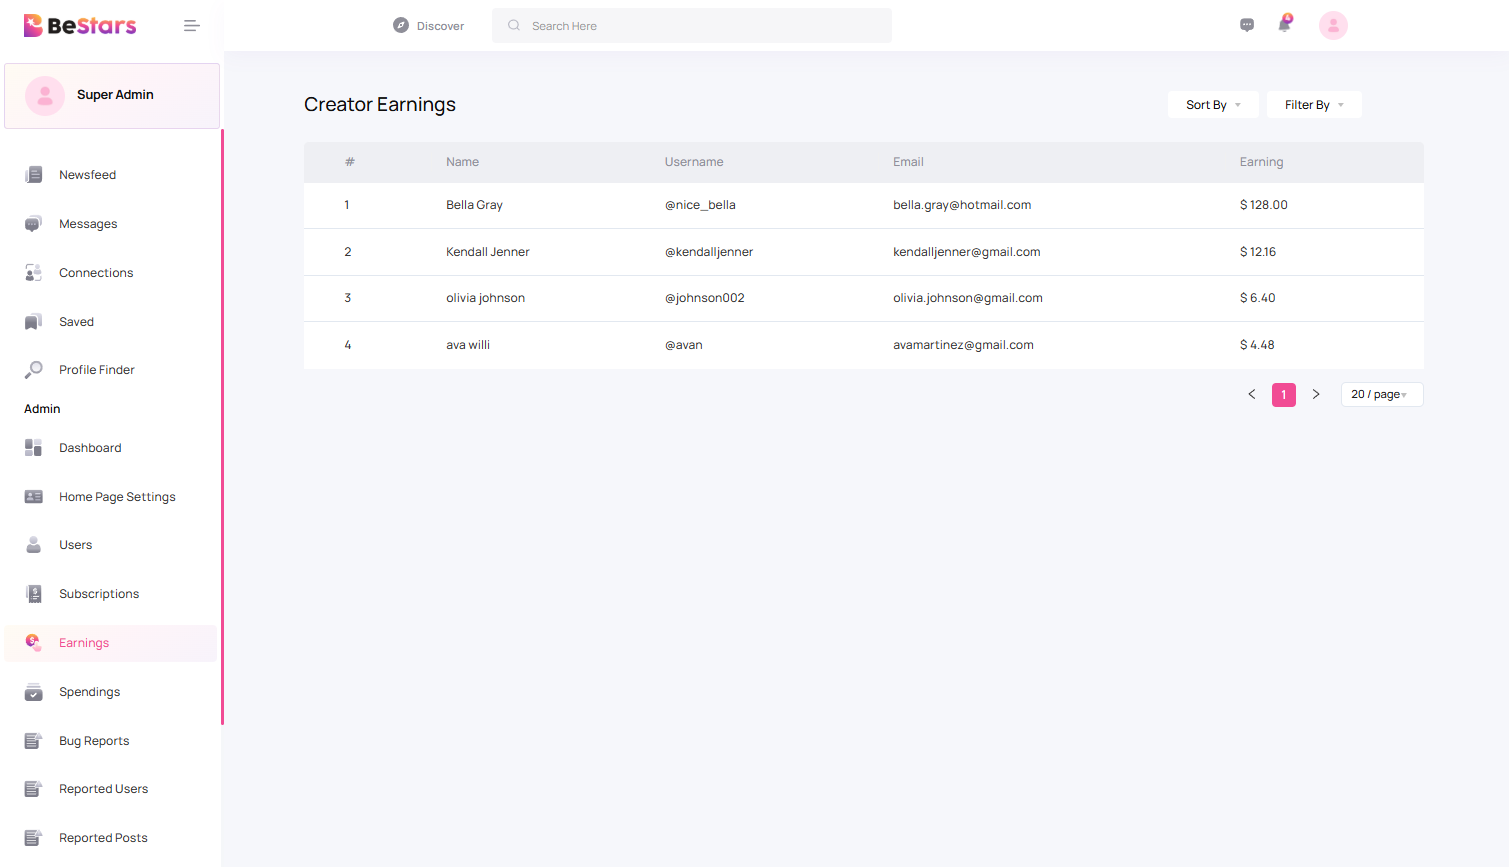
Earnings
This section shows the earnings of each creator on the platform. Admin can only view earnings data; no changes can be made from here.
Earnings are displayed based on the type of income generated by the creator.
- Earnings from subscriptions
- Earnings from paid posts
This helps the admin understand how creators are earning money from the platform and track performance across different income sources.
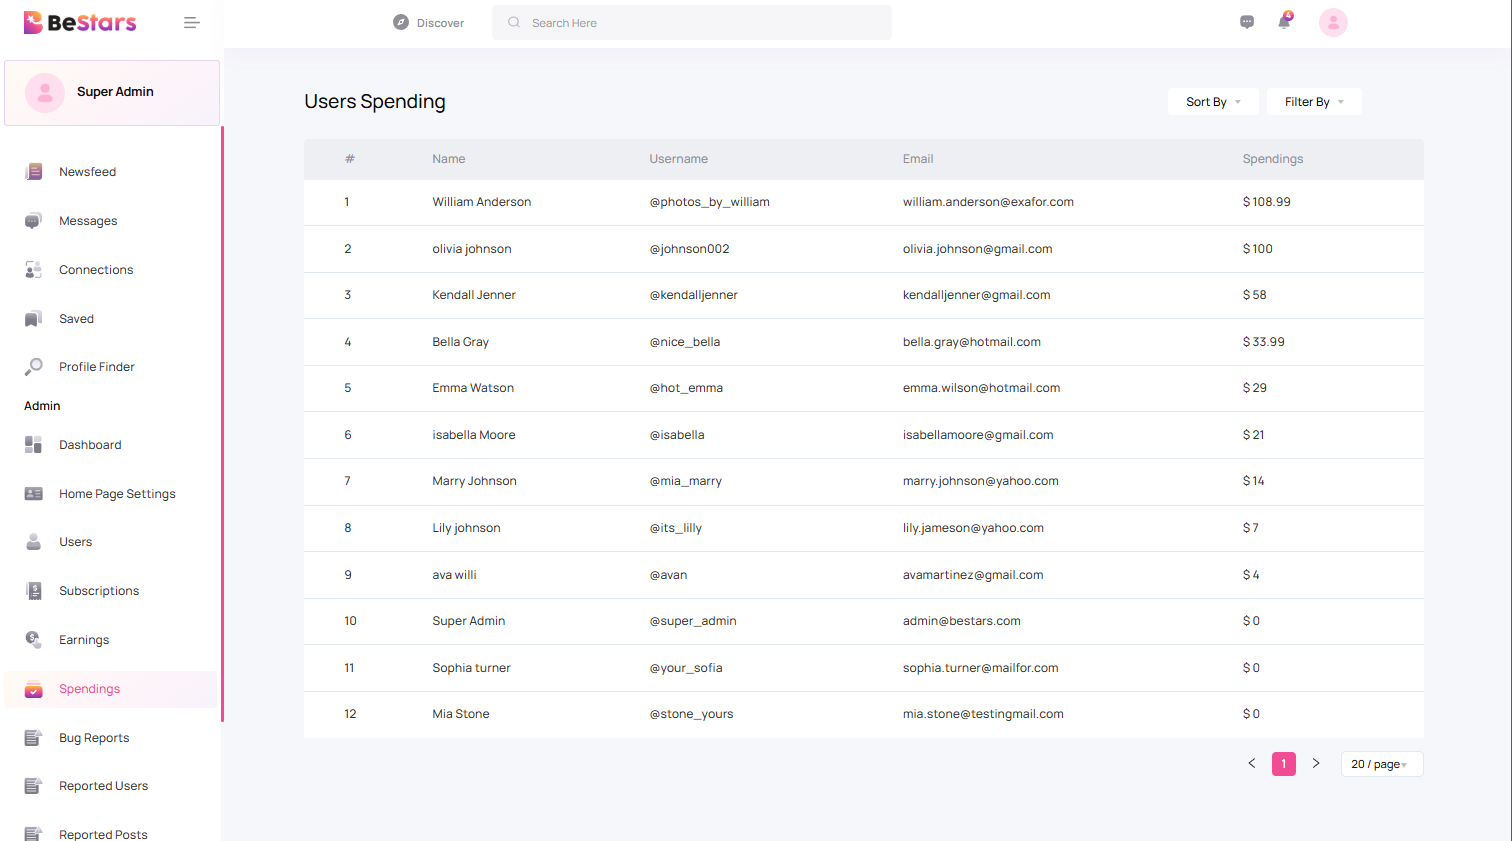
Spendings
This section shows how much users have spent on the platform. Admin can only view user spending details from here.
Spending data includes payments made by users for:
- Creator subscriptions
- Paid posts
This helps track how much each user has paid to creators and understand platform purchase behavior.
Reports & Moderation
This section combines all system reports including bugs, reported users, and reported posts. Admin can monitor platform issues and user activity from a single interface.
Bug Reports
Shows technical issues reported by users such as errors, crashes, or UI problems. Admin can only view reported issues in this section.
- System errors
- UI issues
- Performance complaints
- Feature malfunction reports
Reported Users
Displays all users reported for suspicious or inappropriate activity.
- Spam or fake accounts
- Harassment and abuse
- Policy violations
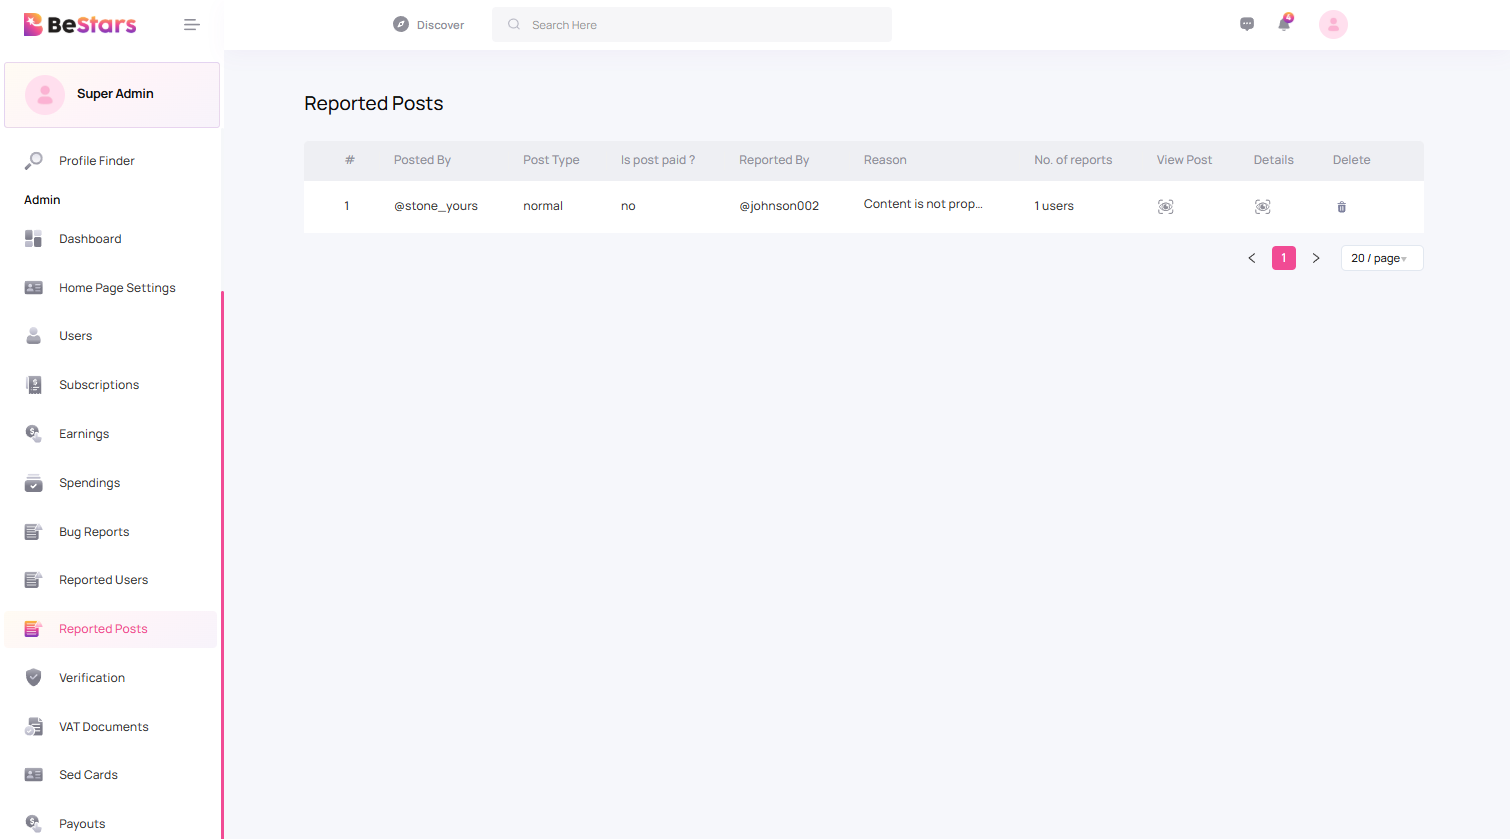
Reported Posts
Displays posts reported by users for violating community guidelines.
- Inappropriate content
- Copyright complaints
- Offensive posts
This section helps maintain platform safety, content quality, and user protection.
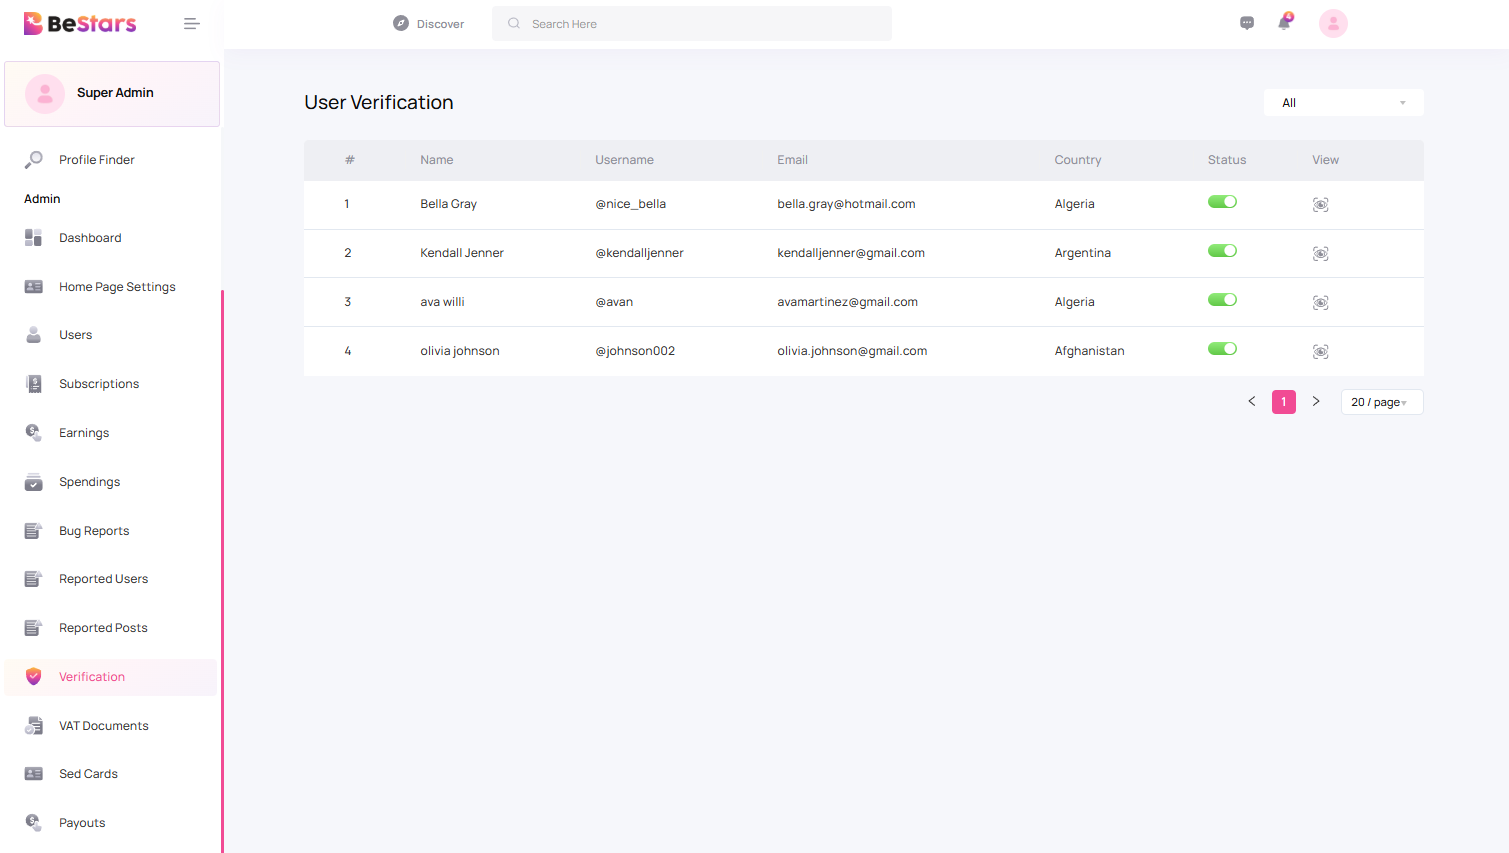
Verification
This section is used to verify users who have applied to become creators (Stars).
Users submit their documents for verification. Admin reviews and approves or rejects the request.
After Approval
- User becomes a verified creator (Star)
- User can create paid posts
- User can offer memberships
- User profile becomes eligible for homepage display
- User can create a Sed Card
Only approved creators will have access to monetization features.
VAT Documents
This section allows the admin to manage tax-related documents submitted by creators. It is used for compliance and payout processing.
Proper management of VAT documents ensures smooth payout processing and platform compliance with tax regulations.
Sed Cards
Digital identity cards for creators used on homepage showcase.
Payouts
This section displays completed payouts made to creators. All payout records shown here are for reference and tracking purposes.
Admin can set the payout processing time in the App Settings. Once the payout date is reached, completed payouts will automatically appear in this list.
- Shows only completed payouts
- Payouts are auto-added after selected payout date
- Creator name and amount are displayed
- Transaction history is stored permanently
This section is used for payout verification and auditing only.
User
User Types
BeStars platform supports three distinct types of users. Each type has specific capabilities and restrictions.
1. Fan
Fans are regular users who explore content on the platform. Their main features include:
- Browse the Newsfeed for posts from Stars and Creators
- Purchase paid posts from Creators
- Subscribe to Creator memberships
- Follow Stars and interact with content
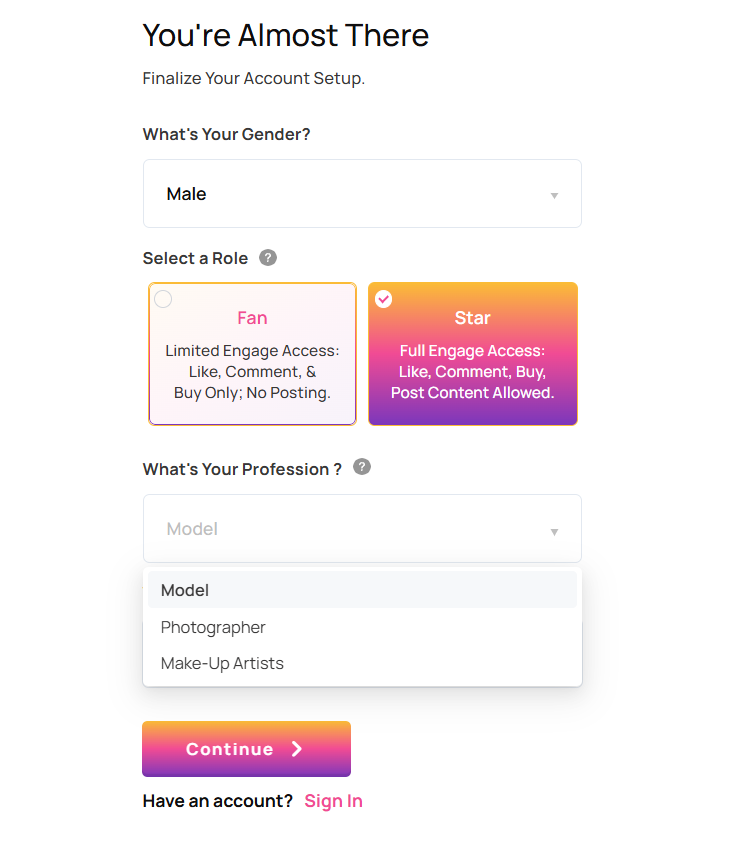
2. Star
Stars are verified users with elevated status who can create content for Fans. Their main features include:
- Create posts visible to Fans
- Create a Sed Card (profile showcase) to be displayed on homepage sections
- Be featured in the “Our Stars” page
3. Creator
Creators are advanced Stars who have applied and been approved for monetization. They have additional premium capabilities:
- Must purchase a premium plan to unlock Creator features
- Create paid posts for Fans to purchase
- Offer membership subscriptions for exclusive content
- Monetize content through Sed Cards and homepage features
Admin can manage user types from the Users section by assigning roles, verifying Stars, and approving Creator applications.
Profession
While registering on BeStars, users can select their profession. This helps categorize profiles correctly from the beginning.
Available Options
- Model
- Photographer
- Makeup Artist
How Profession Is Used
- Displayed on user profile
- Used by admin to group stars
- Used in Profile Finder filters
- Displayed on Homepage categories
Profession can be updated later from profile settings if needed.
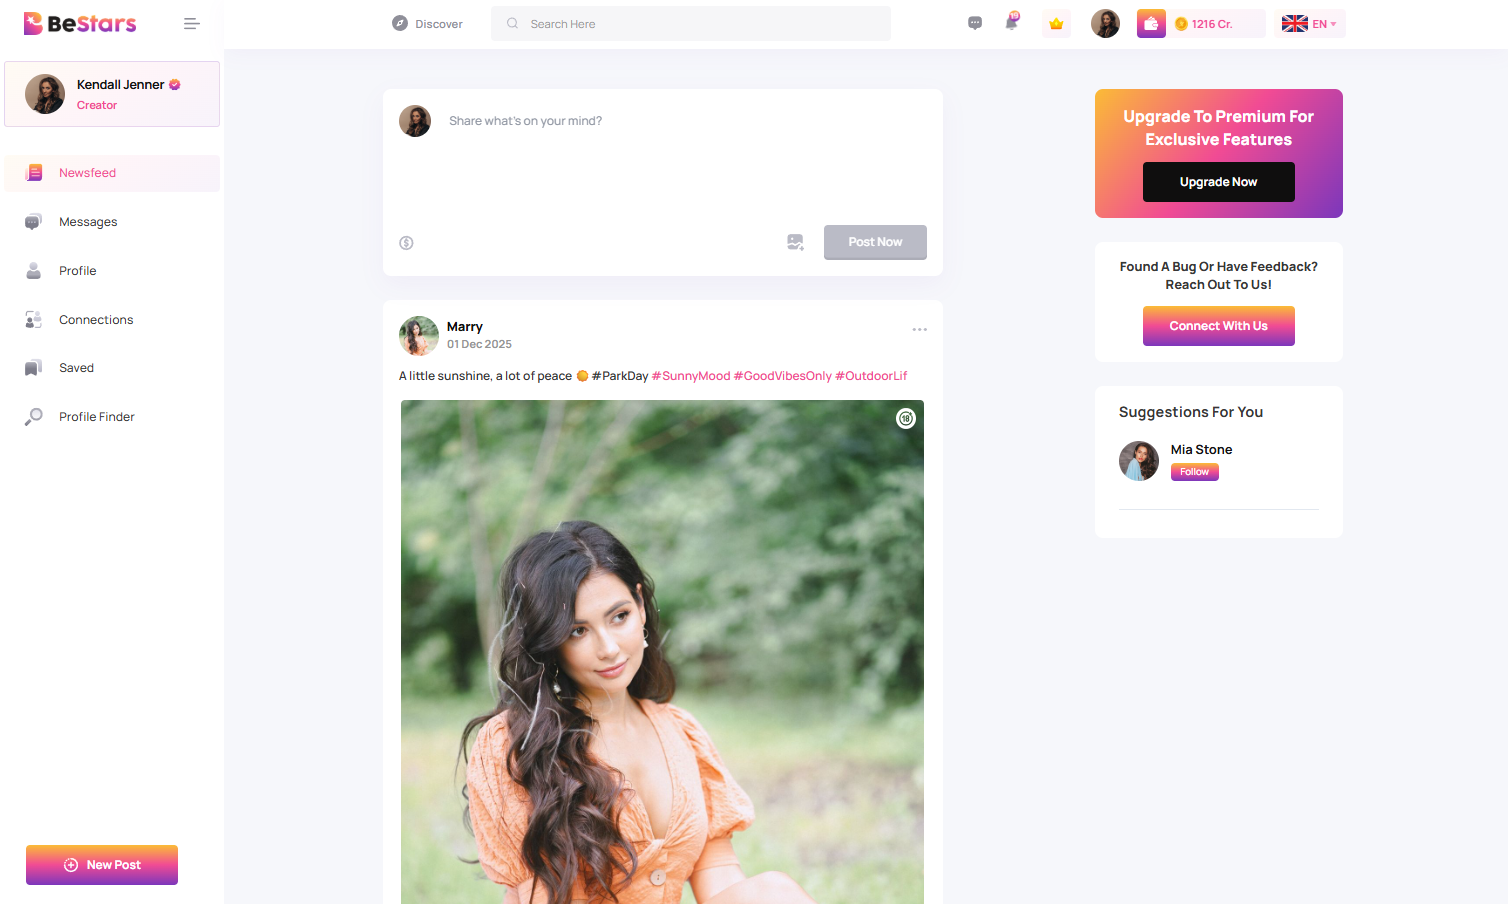
News feed
The Newsfeed is the main content page where users can explore and interact with posts from Stars and Creators across the platform.
This page is accessible to all user types:
- Fans
- Stars
- Creators
Post Types
The Newsfeed contains the following types of posts:
- Free posts visible to all users
- Paid posts available for purchase
- Age-restricted posts with content limitations
- Members-only posts for subscribed users
Paid Posts
Paid posts must be purchased before viewing the full content.
- Available for Fans and non-members
- One-time purchase per post
- Instant unlock after payment
Membership Content
Membership (subscription-based) posts are only visible to users who have an active membership with the Creator.
- Subscribers can access exclusive content
- Non-subscribers see locked content
- Instant access after subscription
Age-Restricted Posts
Certain posts are marked as age-restricted.
- Only visible to verified age users
- Content is blurred if not verified
- Requires user age confirmation before view
This system ensures safe browsing, paid content protection, and controlled access for adult content.
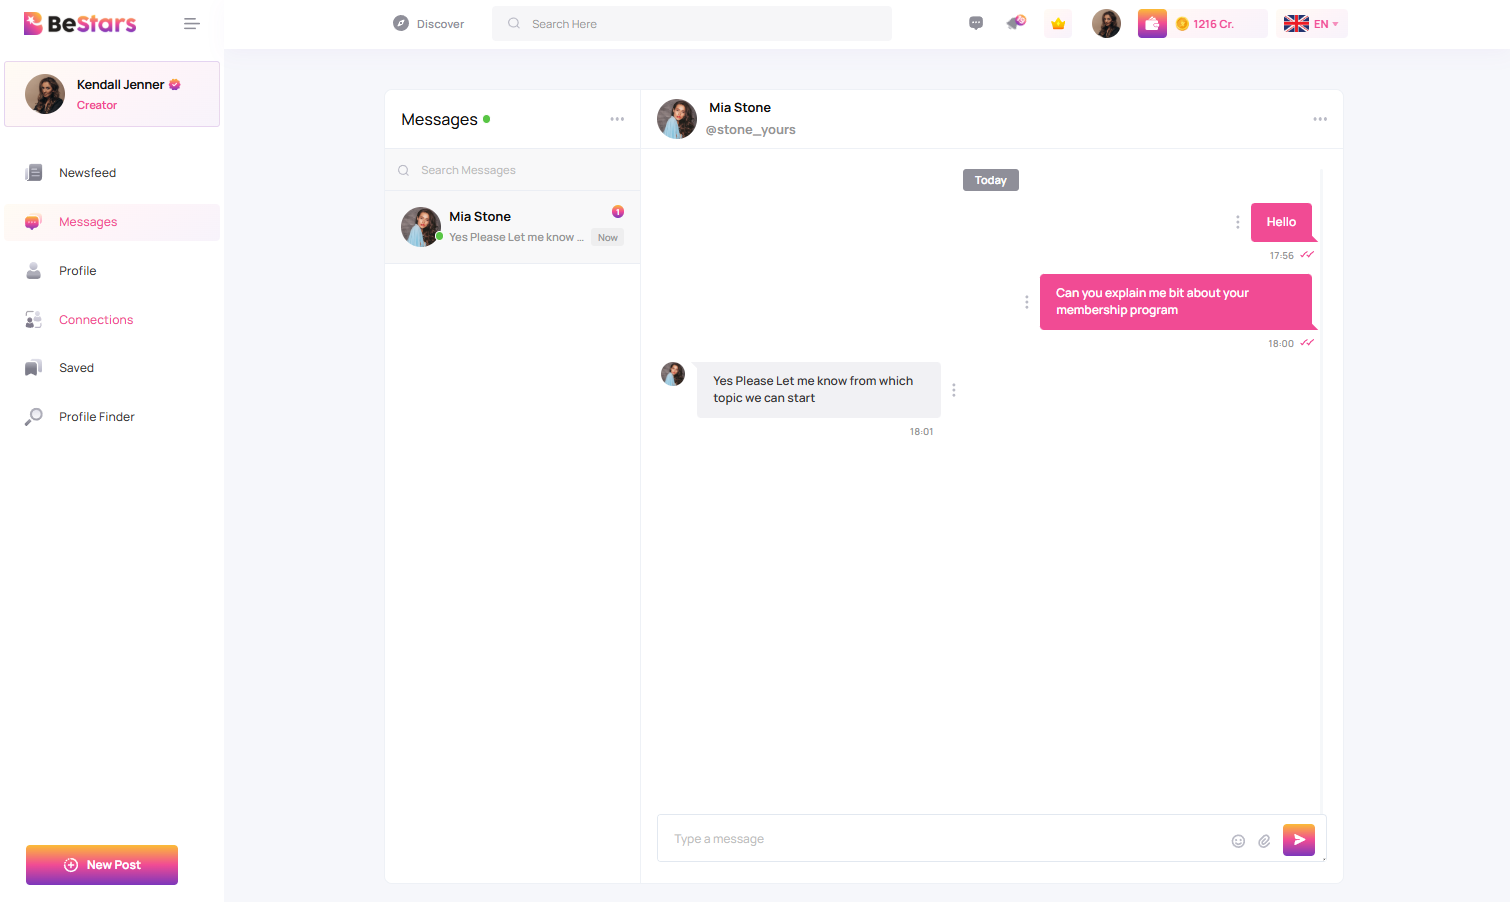
Messages
The Messages section allows users to communicate with each other directly through private chat.
Users can start a conversation by visiting another user’s profile and sending a message.
Features
- Start chat from any user profile
- View previous conversations
- Send and receive messages in real-time
- Message history is saved
- Chat with Stars, Creators, or Fans
Messaging helps users connect, interact, and build relationships on the platform.
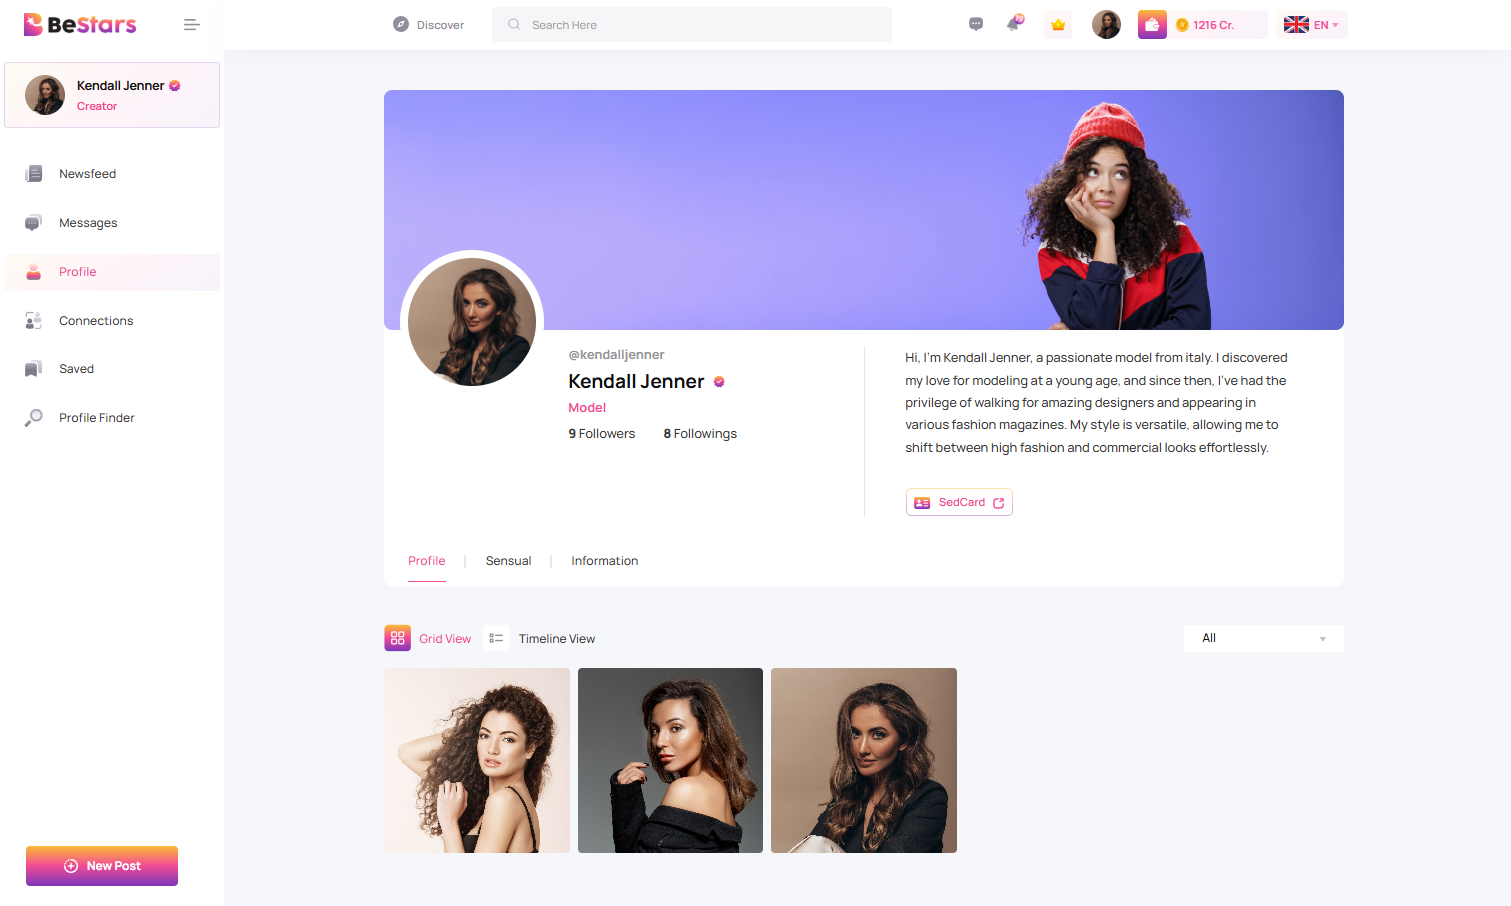
Profile
The Profile page displays a user’s personal information, activity, and public content.
Each user has their own profile where they can view their account details and content performance.
Profile Information
- Profile picture and username
- Follower and following count
- User bio and profession
- Account type (Fan / Star / Creator)
User Content
- All published posts
- Paid posts and free posts
- Membership content visibility
Sed Card
Creators and Stars can display their Sed Card on their profile page.
- Showcase professional identity
- Highlight featured content
- Increase profile visibility
The profile page acts as the digital identity for users and creators on BeStars.
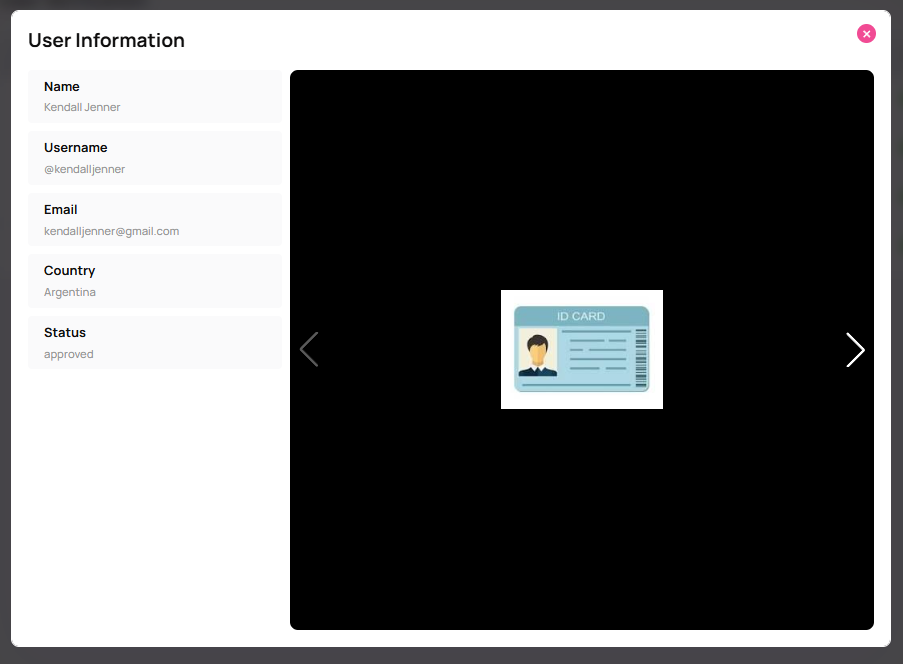
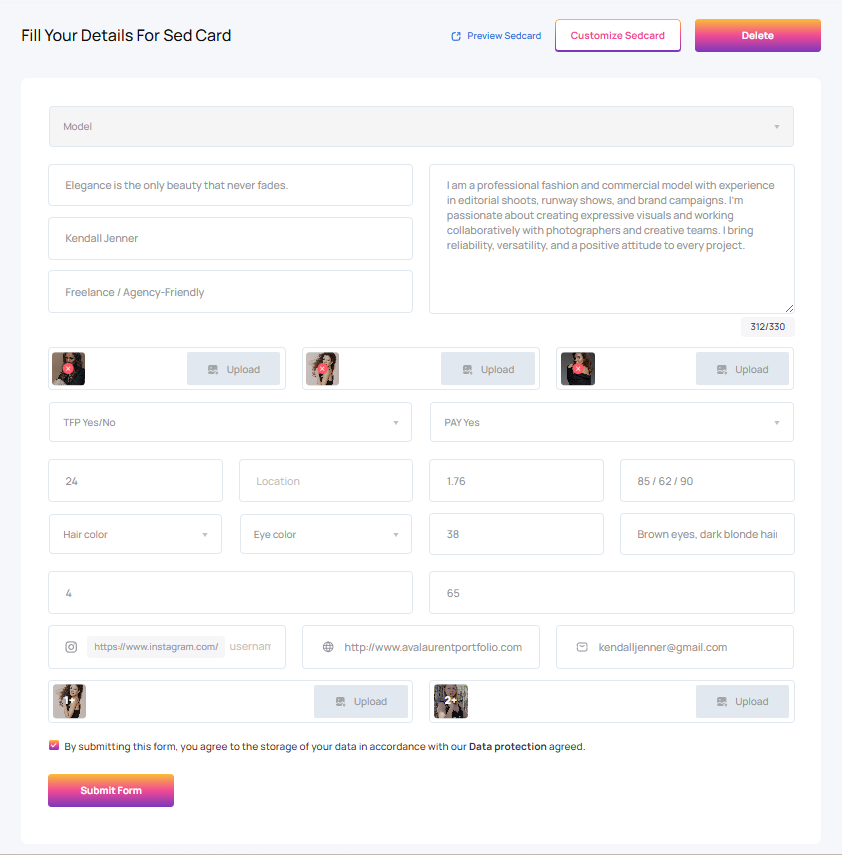
Sed Card
The Sed Card is a digital portfolio for Stars and Creators where they can showcase their professional profile with personal details, experience, and gallery images.
Access path: Header → Profile → Subscription Plan
Create Sed Card
Users can create and manage their Sed Card by entering the following information display in screenshot below:
Display Options
- Sed Card displays on user profile
- Visible publicly based on settings
- Premium users are eligible for homepage display
- Admin can feature Sed Cards on:
- Homepage
- Our Stars page
- Category sections (Models, Photographers, Makeup Artists)
Only users with an active Premium Plan are eligible for homepage featuring. Admin controls visibility and featured placement.
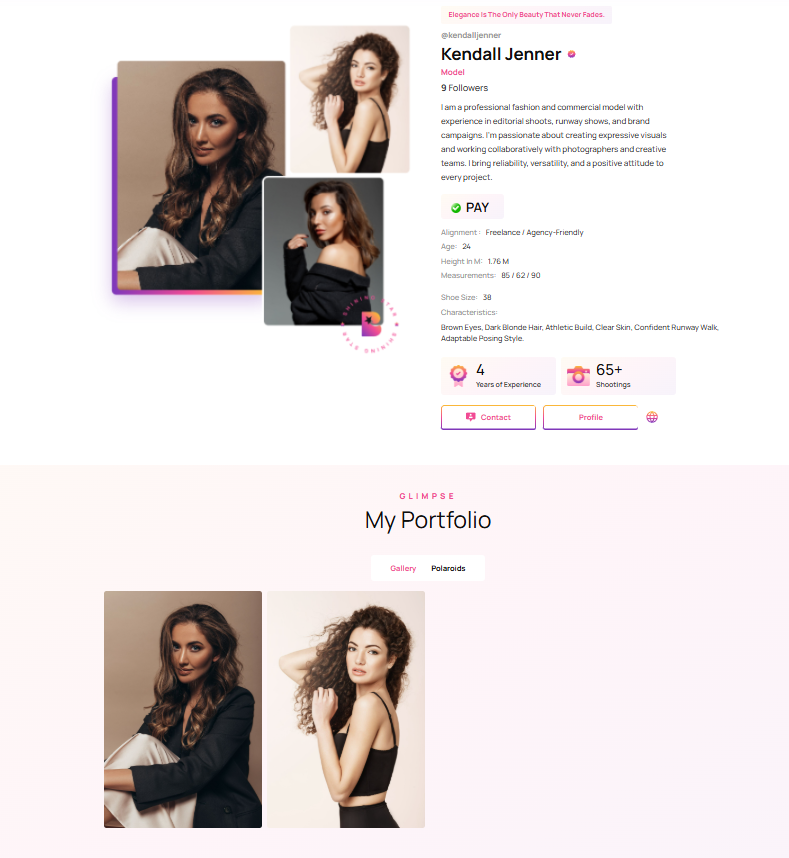
Sed Card Edit Preview
Sed Card Preview
Subscription Plan
This section allows Stars and Creators to create membership plans for their followers.
Access path: Header → Profile → Subscription Plan
Subscription Duration Options
Creators can create subscription plans using the following durations:
- Monthly Plan
- 3 Months Plan
- 6 Months Plan
- 12 Months Plan
Plan Setup
- Set price for each plan duration
- Add title and description
- Enable / disable plans anytime
- Edit pricing easily
Access Rules
- Subscribers get access to paid posts
- Free posts remain public
- Paid posts are locked for non-subscribers
Only active subscribers can view premium content.

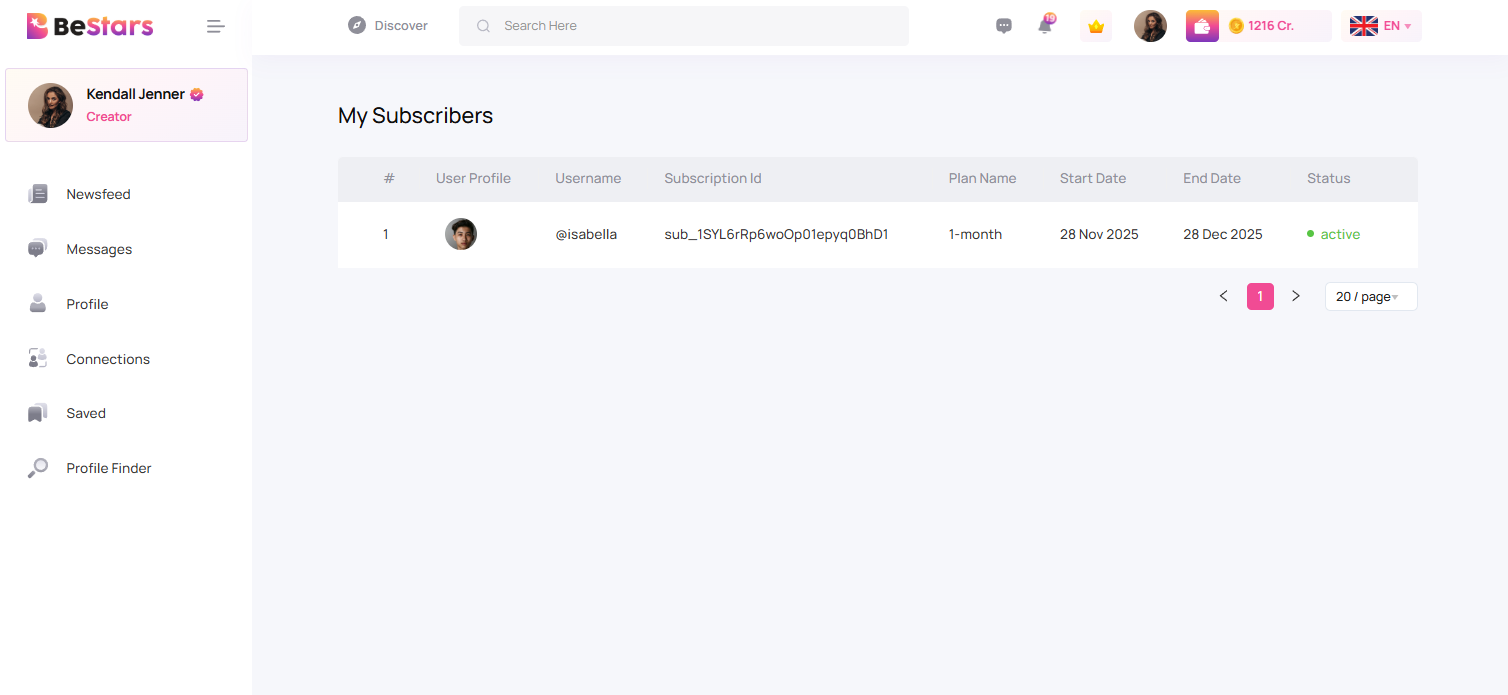
My Subscribers (Creator)
This section is available for creators to view users who have purchased their subscription plans.
Access path: Header → Profile → My Subscription
Subscriber Details
- Subscriber profile details
- Purchased plan type (Monthly / 3 / 6 / 12 months)
- Subscription start and expiry date
- Subscription status (Active / Expired)
- Total paid amount
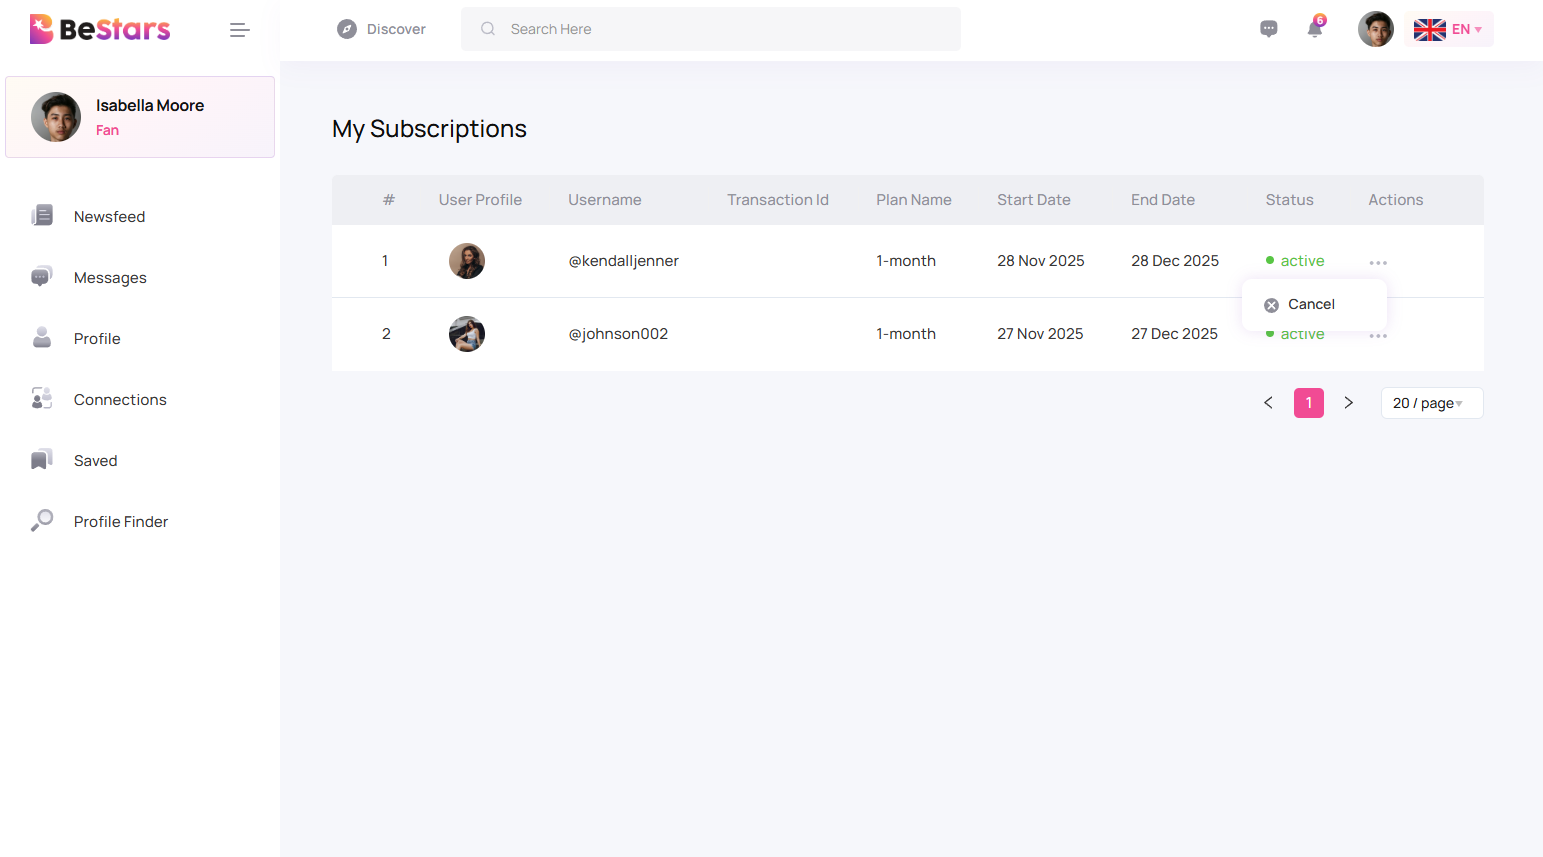
My Subscriptions
The My Subscription page displays all creator subscriptions purchased by the user.
Access path: Header → Profile → My Subscriptions
What Is Displayed
- Creator name and profile
- Subscription plan type
- Subscription start date
- Expiration date
- Subscription status (Active / Expired)
- Access to creator paid posts
User Actions
- View creator profile
- Cancel subscription
- Renew expired subscription
Only active subscriptions allow access to paid and members-only content created by creators.
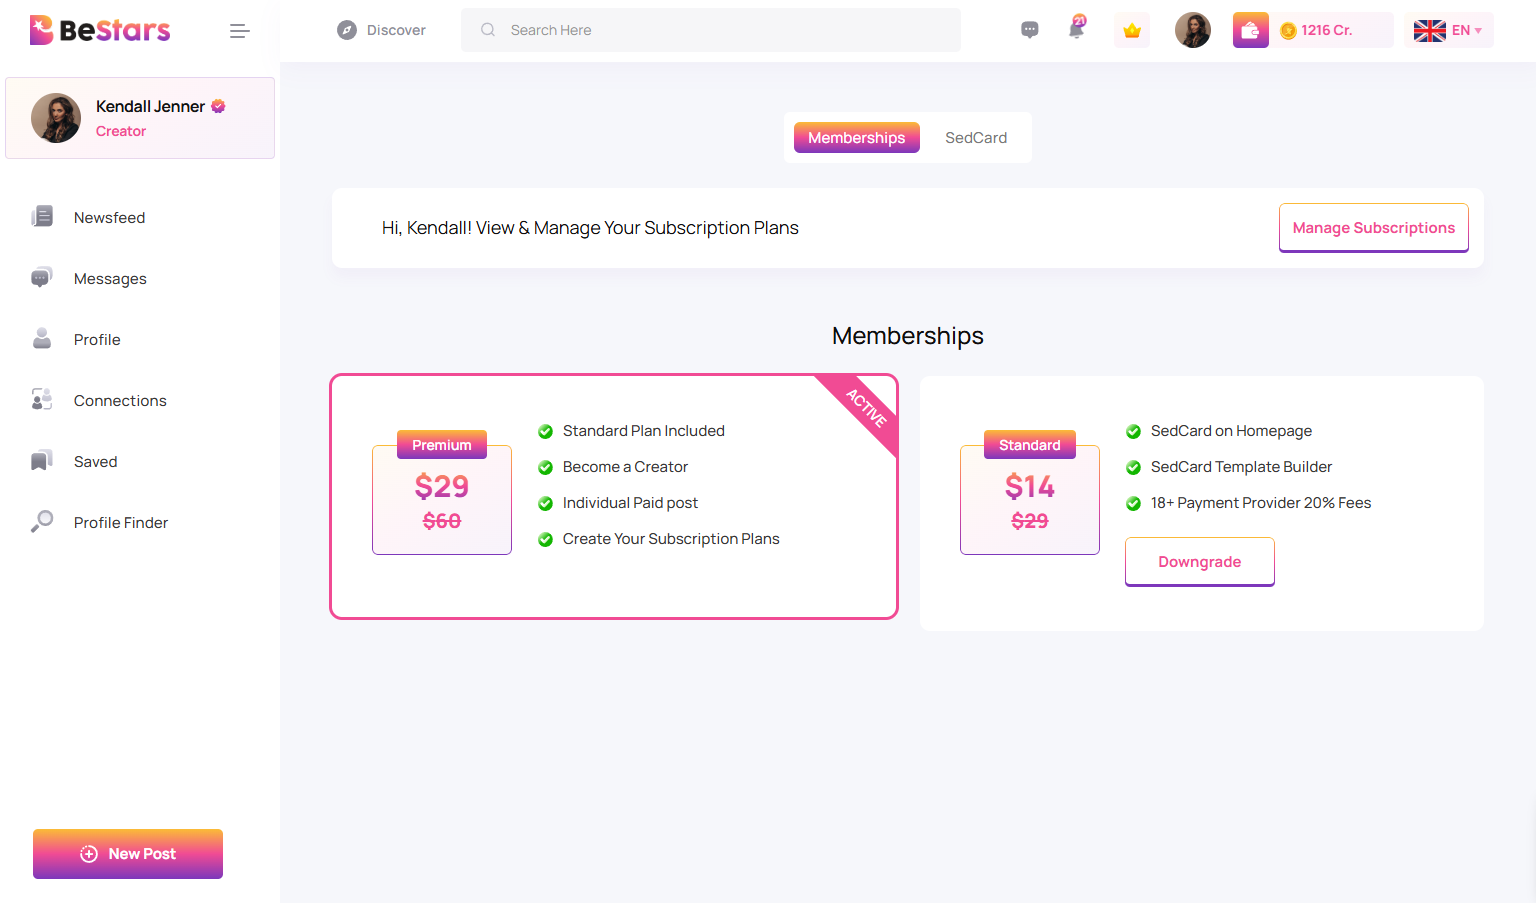
Your Membership
The Your Membership section allows users to purchase different plans based on the features they want to use on BeStars.
Access path: Header → Crown Icon → Your Membership
Plan Types
1. Premium Plan (Creator Access)
This plan is required for users who want to become a creator.
- Apply for Creator Role
- Request admin verification
- Create paid posts
- Create paid memberships for followers
- Appear on homepage if approved by admin
2. Standard Plan (Sed Card & Age Restricted Access)
This plan allows stars to create Sed Cards and publish age-restricted posts.
- Create Sed Card profile
- Enable age-restricted content
- Show Sed Card on profile
3. Sed Card Image Plan (Extended Upload)
This plan increases upload limits specifically for Sed Card images.
- Upload up to 50 photos in Sed Card
- Extended gallery access
- Professional portfolio showcase
Billing Cycle
- All membership plans are billed monthly
- Plans renew automatically unless canceled
- Users can upgrade or cancel anytime
Membership features become available immediately after payment confirmation. Admin approval is required for creator access after purchasing the Premium Plan.
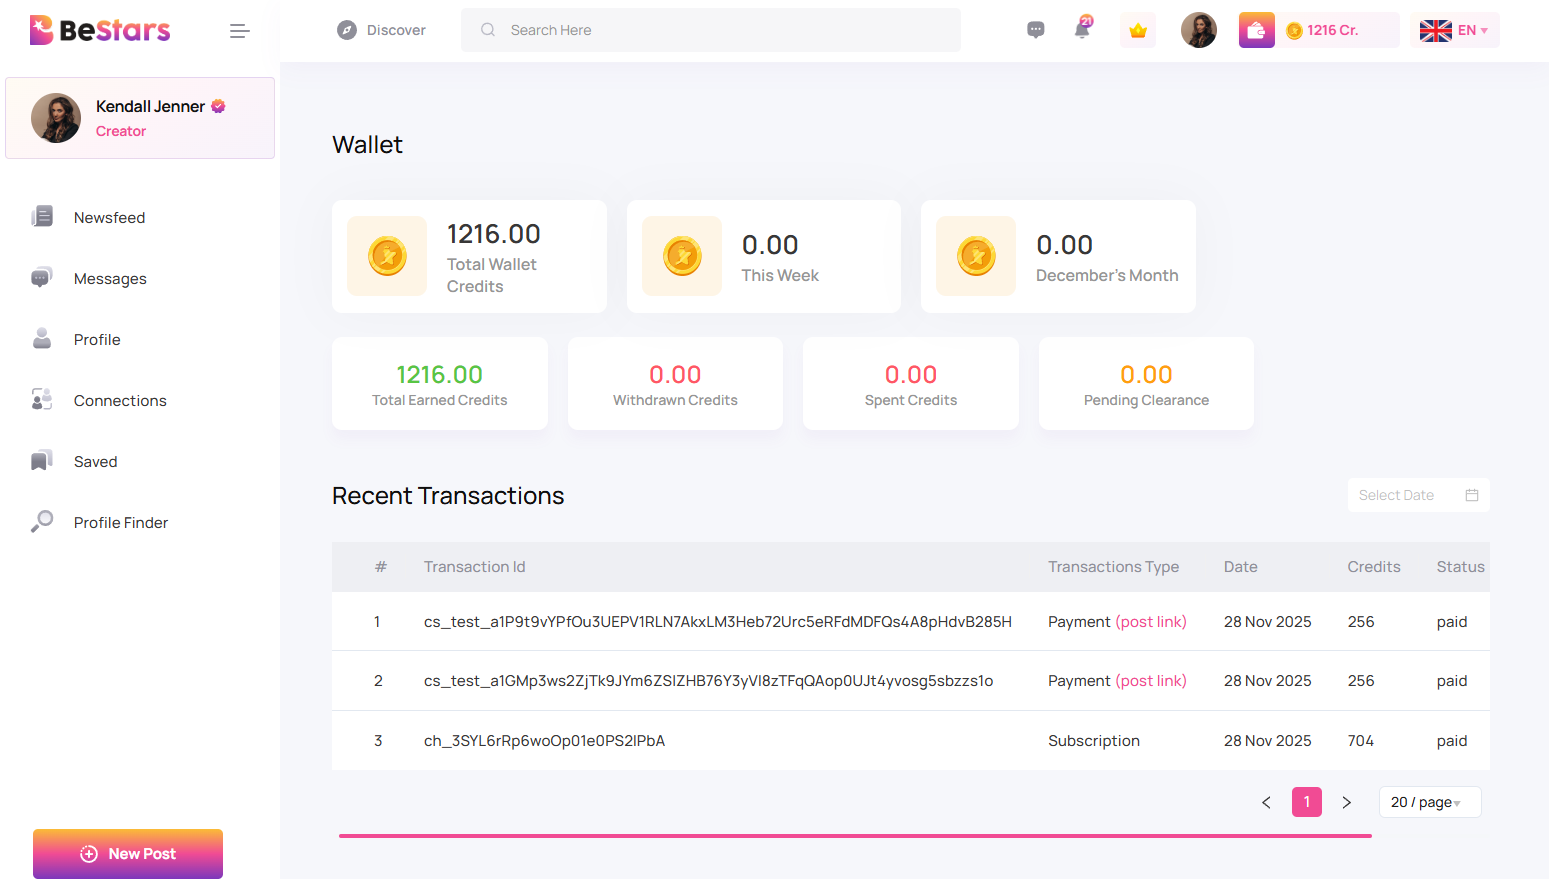
Wallet (Creator Only)
The Wallet panel shows detailed earnings and transaction statistics for creators. This section is available only to creators who publish paid content and subscriptions.
Access path: Header → Profile → Wallet
Wallet Summary
- Total Wallet Credits: Displays the current available balance.
- This Week: Earnings received in the current week.
- This Month: Earnings received for the current month.
- Total Earned Credits: Lifetime earnings of creator.
- Withdrawn Credits: Total amount withdrawn by the creator.
- Spent Credits: Payments or deductions from wallet.
- Pending Clearance: Earnings under holding period set by admin.
Transaction History
All payments and deductions are listed in the Recent Transactions section.
- Subscription payments
- Paid post purchases
- Payout approvals
- VAT deductions
- Refunds (if any)
The wallet balance updates automatically after the holding timer and VAT approval process.
Other Sections
BeStars provides additional user features for managing accounts, discovering profiles, earning through referrals, and receiving real-time notifications.
Profile Finder
Profile Finder helps users discover other accounts easily.
- Search by username
- Filter by profession
- Explore Stars and Creators
- View Sed Card profiles
Account Settings
Users can manage their personal profile and application settings from Profile > Account Settings.
- Profile: Edit profile picture, name, and bio
- Account Settings: Update email and password
- My Subscriptions: View purchased creator subscriptions
- My Subscribers: View followers (Creators only)
- Referral: View referral earnings
- Subscription Plan: Buy or manage membership
- Logout: Secure account logout
Live Notifications
Users receive real-time notifications for messages and post activity.
- New message alerts
- New post notifications
- Subscription updates
- Referral reward alerts
- Creator approval notifications
Saved Posts
The Saved Posts section allows users to view all the posts they have saved for later.
Users can bookmark any post from the newsfeed or profile pages.
Features
- View all bookmarked posts
- Quick access to favorite content
- Access free and purchased paid posts
- Membership-based content visibility
Saved posts help users easily find content they want to view again without searching.
Help And Support
In order to receive a technical support assistance, you need to have a valid purchase code. To get the code, please navigate to your Codecanyon "Downloads" page and click on the plugin download link.
After getting the Purchase code, please follow the steps mentioned on the link click Here to get your product verified. And then share your Purchase code and token ID with the support team.
If you have any questions that are beyond the reach of this help file, feel free to contact us. We will respond as soon as possible (within 24 – 48 hours, usually faster). We are open from 10:00am to 07:00pm (IST), from Monday till Friday.
NOTE: As authors of this script we do provide support only for the script-related features.
Outro
Thank you for your purchase. If you have any questions that are beyond the scope of this help file, please contact us through support@pixelnx.com
Once again, thank you so much for purchasing this script. As I said at the beginning, I'd be glad to help you if you have any questions relating to this script. No guarantees, but I'll do my best to assist. If you have a more general question relating to the script, you might consider visiting the forums and asking your question in the "Item Discussion" section.